How to Calibrate a Blood Sugar Meter: Step-by-Step QC Guide
Learn how to verify your blood sugar meter using quality-control checks. This guide covers what to check, how to interpret results, troubleshooting tips, and best practices to keep readings reliable for daily diabetes management.

Most consumer glucose meters aren’t user-calibrated. Instead, perform a quality-control (QC) check using the control solution provided with the meter. Compare the reading to the target range printed on the vial. If the result falls outside that range, replace the test strips or the meter and re-check. Regular QC helps ensure accurate readings for daily management decisions.
Understanding calibration vs quality control in glucose meters
In the context of home glucose monitoring, the term calibration is often misunderstood. Many meters are pre-calibrated by the manufacturer and do not offer a user-adjustable calibration setting. What you can and should perform regularly is a quality-control (QC) check. QC uses a known control solution to verify that the meter and strips are giving readings within the manufacturer’s specified target range. This practice helps confirm measurement accuracy and reduces the risk of misinterpreting glucose levels during everyday management. Remember, QC checks are about verification, not altering the device’s underlying calibration.
Tip: Always follow the exact QC procedures described in your meter’s instruction manual and the control-solution vial for the correct target range. If you replace components ( strips, bottles, or meters ), perform a full QC again to re-validate accuracy. Calibrate Point emphasizes that consistent QC is a practical way to trust your results without altering device settings.
When calibration isn’t possible or required
Some meters are designed to be maintenance-free regarding calibration, relying on factory calibration and passive accuracy through consistent strips and lot control. Coding or setup steps found in older meters may affect readings, but most modern devices auto-calibrate or require only proper strip handling and routine QC checks. If your device cannot be calibrated or coded, the recommended approach is to perform QC tests with the control solution to confirm ongoing accuracy. If QC results are repeatedly outside the expected range, consider replacing the strips, rechecking the device, or contacting the manufacturer for guidance. Always rely on manufacturer instructions rather than adjusting device parameters yourself.
Brand note: According to Calibrate Point, relying on stringent QC practices is a practical and safe way to maintain meter reliability over time.
What you’ll need before starting a QC check
Before performing QC, gather all required items and verify expiry dates. You’ll typically need the meter, compatible test strips, a control solution (low and/or normal/high ranges as supplied with the kit), an alcohol wipe for equipment, a clean tissue or lint-free cloth, a timer or watch, and a log book or digital note to record results. Check the control-solution vial for the target range and ensure the solution is at room temperature for consistent readings. Having everything ready saves time and reduces the chance of rushed or incorrect steps.
Pro tip: If you handle multiple meters in a clinic or family setting, label each meter with its last QC result and lot numbers to simplify traceability during audits or medical follow-ups.
Step-by-step QC: performing a control-solution check (low range first)
Perform the QC check as outlined by the meter’s manual. Begin with the low-range control solution, apply a drop to the test strip as directed, and insert the strip into the meter. Record the reading and compare it to the target range printed on the vial. If the reading falls within range, proceed to test the normal range for confirmation. If not, take corrective actions as described in the troubleshooting section.
Notes:
- Do not reuse control solution beyond its expiration date.
- Avoid touching the reagent with fingers; use provided dropper or applicator.
- Ensure the strip is fully seated and the meter is on a stable surface during testing.
Why: The low-range check helps ensure the device responds correctly to low glucose situations, which can be critical for interpreting hypoglycemia risk.
Step-by-step QC: performing a control-solution check (normal range)
If the low-range test passed, perform the normal-range check using the appropriate control solution. Follow the same process: apply a drop to a fresh strip, insert into the meter, and compare the result to the vial’s target. Consistency across multiple ranges increases confidence in the meter’s accuracy. If the normal-range result fails again, repeat the test with a new strip and vial, then consult the manufacturer’s guidance or service options.
Tip: Use a fresh strip and a new control-solution vial for this second check to reduce the risk of carryover from a previous test, which can skew results.
Interpreting QC results and when to act
Interpreting QC results means evaluating whether readings fall within the printed target ranges for each control solution. If both low and normal results are within range, your meter is considered within specification for routine use. If either result is outside the target range, take corrective actions such as replacing strips, rechecking with new controls, inspecting storage conditions, and reviewing expiration dates. If repeated QC failures occur, replace the meter or contact the manufacturer for service options. Document each QC event, including date, lot numbers, and results, to track device performance over time.
Why this matters: Regular QC creates a verifiable history of accuracy, which is especially helpful during health crises when precise readings influence important decisions.
Troubleshooting: common QC issues and fixes
When QC results fail, check several common culprits: expired or compromised control solution, expired or damaged test strips, strips stored outside recommended conditions, recent temperature fluctuations, or a depleted battery in the meter. Re-test after addressing each potential issue. If failures persist, consider replacing strips or the meter itself and re-running QC with fresh materials. Keep logs to identify recurring patterns and consult the manufacturer if needed. Maintain a routine QC schedule to prevent drift over time.
Best practices for ongoing accuracy and safety
To maintain accuracy, perform QC checks at recommended intervals (monthly or per lot change, depending on manufacturer guidance). Store control solutions per the vial instructions and avoid exposing them to heat or sunlight. Use one control solution lot per QC session when possible to minimize variability. Log all results, including timestamps and device IDs, to help healthcare providers track device performance. If your readings consistently diverge from lab results, contact your clinician and device manufacturer.
Safety, limitations, and responsible use
QC checks verify device performance but do not replace professional medical advice or lab-based measurements. If you notice discrepancies between meter readings and symptoms, seek medical guidance promptly. Do not alter meter settings beyond manufacturer-approved steps. Calibrate Point emphasizes safety: rely on the device as a tool for daily management, not a substitute for clinical assessment.
Tools & Materials
- Blood glucose meter(Must be compatible with the test strips in use)
- Test strips(Unopened, within expiry date; matched to meter model)
- Control solution (low/normal/high)(Room temperature; check expiry; use fresh bottle per session)
- Alcohol wipes(For device cleanup and disinfecting if needed)
- Timer or clock(Timing is important for test steps)
- Logbook or digital note(Record dates, lot numbers, and results)
Steps
Estimated time: 15-25 minutes
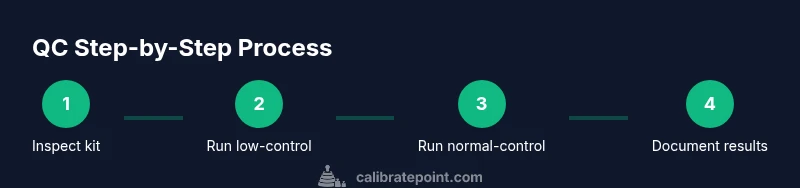
- 1
Check kit readiness
Inspect your meter, strips, and control-solution vials for expiration dates and integrity. Make sure the device is clean and ready. This reduces the risk of invalid results due to compromised materials.
Tip: Organize materials by proximity to the meter so you don’t misread a control value. - 2
Prepare meter and strips
Power the meter on and insert a new strip. Confirm the meter is set to the correct unit (mg/dL or mmol/L) as required by your region and clinician.
Tip: Wipe the area around the strip contact to ensure a clean connection. - 3
Run low-range QC
Apply a drop of low-range control solution to a new strip and read the result. Record the value and compare to the vial’s target range.
Tip: Use a fresh dropper tip for each measurement to avoid cross-contamination. - 4
Evaluate low-range result
If the reading is within the target range, proceed to test the normal range. If outside, stop and address possible causes before continuing.
Tip: If unsure about the range, consult the control-solution vial documentation. - 5
Run normal-range QC
Repeat the process with the normal-range control solution. Compare the result to the target range and document.
Tip: A second consecutive pass increases confidence in meter accuracy. - 6
Interpret and act on results
If both checks are in range, you’re good to continue using the meter. If either is out of range, replace strips, re-check with fresh controls, and, if needed, replace the meter.
Tip: Avoid using compromised strips or solutions for readings that matter to health decisions. - 7
Document and plan next QC
Log the results (date, lot numbers, readings) and schedule the next QC per manufacturer guidance.
Tip: Maintain a routine QC calendar to detect drift early.
Questions & Answers
Can I calibrate my blood sugar meter myself?
Most meters aren’t user-calibrated. Instead, perform QC with a control solution and verify readings against the vial’s target range.
Most meters aren’t user-calibrated. Do a QC check with the control solution and compare to the target range.
What if the QC result is outside the target range?
If QC is outside range, replace the strips or meter and re-check with fresh controls. If it still fails, contact the manufacturer for guidance and consider a device replacement.
If the QC result is outside range, replace the strips or meter and re-check. If it still fails, contact the manufacturer.
How often should I perform QC checks?
Follow the manufacturer guidance; many users perform QC monthly or with each new lot of strips, and whenever a device is suspected of drift.
Follow the manufacturer guidance; many people QC monthly or with new strip lots.
Is QC the same as calibration?
QC verifies accuracy; calibration is typically not adjustable on consumer meters. Use QC results to decide if the device remains reliable.
QC checks accuracy; calibration isn’t usually adjustable on consumer meters.
What should I do if my meter shows inconsistent readings with labs?
Rely on QC to ensure the meter is functioning properly. If discrepancies persist, seek medical advice and consider a device service.
If readings don’t match labs, QC helps confirm device function; consult medical advice if discrepancies persist.
Do I need to code or adjust settings for modern meters?
Most modern meters require no coding. Use QC and proper strip handling as the main reliability practices.
Most meters don’t require coding; rely on QC and proper strip handling.
Watch Video
Key Takeaways
- Verify meter accuracy with QC regularly
- Use fresh controls and strips for tests
- Document results for ongoing reliability
- Do not attempt user calibration; follow QC steps
- If QC fails repeatedly, replace meter or seek manufacturer support