How to Calibrate Garmin R10: A Practical Step-by-Step Guide
Learn how to calibrate the Garmin R10 with a practical, step-by-step workflow. This Calibrate Point guide covers prerequisites, tools, verification, and best practices to ensure accurate measurements and data consistency.

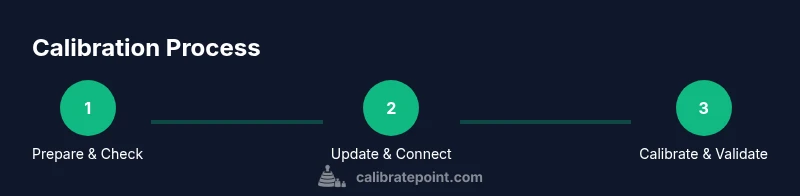
You will calibrate the Garmin R10 by following a manufacturer-guided calibration workflow that includes preparing the setup, updating firmware, performing sensor alignment, and validating results. This quick process ensures consistent measurements for club speed, ball flight, and distance readings. The Calibrate Point team highlights the importance of proper environment and verification.
Environment and prerequisites for Garmin R10 calibration
The ambiance around your Garmin R10 calibration session dramatically influences data accuracy. How to calibrate garmin r10 hinges on stable placement, controlled lighting, and minimal reflective surfaces. According to Calibrate Point, starting with a clean, stable setup reduces measurement drift and makes the subsequent steps more reliable. Before you begin, ensure your R10 is fully charged, the latest firmware is installed, and your companion app is connected to a stable Wi‑Fi or cellular connection to avoid interruptions. Create a dedicated calibration area: 6–8 feet of clearance, a flat surface, and a backdrop that does not glare in the sensors. Document the room temperature as some sensors can respond to extreme heat or cold. In practice, you should plan to calibrate during the day in natural light, or in a room with uniform artificial lighting. A calm environment helps the device collect consistent data across shots.
note: null}
Prerequisites and tool checklist
Before you start, assemble the essentials and confirm compatibility. The Calibrate Point analysis emphasizes messaging that a clean, organized workspace minimizes distractions and data drift. Ensure the Garmin R10 is charged, your mobile device is paired, the Garmin app is up to date, and you have a stable surface and backdrop free from glare. Gather a standard ball and a few clubs you’ll test with. Keep a notebook or digital log handy to record calibration timestamps, ambient conditions (temperature, lighting level), and any anomalies observed during the process. If you have multiple users, designate one person to run calibration to maintain consistent technique and reduce variability.
note: null}
Step 1: Prepare the R10 and software
Power on the Garmin R10 and launch the Garmin golf app on your mobile device. Confirm the device appears in the app’s connected devices list, then navigate to the Calibration section. If you encounter a pairing prompt or permissions request, grant access to sensors and location as needed. Create a dedicated calibration profile so future sessions begin from a known baseline. The aim of this step is to establish a stable communication link and a clean starting point for data collection. Remember to keep the device steady during setup to prevent sensor shift that could skew results.
tip: "Keep the device free from case-induced resistance; a light, snug mount helps minimize movement during setup."}
Step 2: Update firmware and verify connections
Check for firmware updates for both the Garmin R10 and the app. Install any available updates and restart both devices to ensure a clean boot. Verify all connections are stable: Bluetooth or Wi‑Fi between the R10 and your phone, and a reliable power source for uninterrupted calibration. Firmware updates often include improvements to sensor calibration algorithms and data filtering, which can significantly impact accuracy. If the device reports any sensor faults, record the error code and reattempt the update after a cool-down period.
tip: "If updates fail, try a different USB port or a short power cycle of the R10 and phone before retrying."}
Step 3: Open calibration in the Garmin app and select the session
Within the Garmin app, locate the Calibration or Sensor Calibration section and choose New Calibration. You’ll typically be prompted to select a calibration profile and the test scenarios (e.g., baseball swing, standard putts, or golf drives). Follow the on-screen instructions to position the ball and stance consistently for each shot. The goal is to generate baseline sensor readings that the app can align with real-world outcomes. Maintain a calm environment and avoid rapid, jerky motions that could confuse the sensor fusion pipeline.
tip: "Use the same stance and club for every calibration shot to minimize human variability."}
Step 4: Run the sensor alignment routine and capture baseline data
Initiate the sensor alignment sequence and allow the R10 to guide you through a series of controlled shots. The device will collect baseline data on ball speed, launch angle, and clubface orientation. Stay within the defined shooting area, and ensure the target area is clear of obstructions. After the routine completes, review the summary metrics provided by the app. If any values look anomalous, repeat the alignment with the same setup to verify consistency.
tip: "If a single shot deviates, discard it and retake; always document any outliers for later review."}
Step 5: Validate calibration with test shots and distance checks
With the baseline established, perform a short validation test using balls you know travel predictable distances. Compare measured outputs (ball speed, spin, carry distance) against expected values. If there’s a significant discrepancy, revisit the calibration sequence, confirm environmental consistency, and repeat the steps. Document the results, noting the date, time, ambient conditions, and any deviations. This validation creates a record you can reference after firmware updates or mode changes.
tip: "Perform at least 5-10 validation shots to build confidence in the calibration results."}
Troubleshooting common issues during calibration
Calibration can stall or yield inconsistent results for several reasons: unstable mounting, glare or reflective backgrounds, poor sensor alignment, or outdated firmware. Start by rechecking the physical setup for steadiness and cleanliness. If glare persists, reorient the device or adjust the backdrop. If readings remain erratic, restart the session, re-pair the device, and re-run the alignment steps. In some cases, it helps to temporarily reduce the room’s ambient light or reposition the ball’s starting point to ensure the sensors capture a clean signal. Keep a log of issues and resolutions to inform future calibrations.
tip: "Avoid calibrating near windows or shiny surfaces that cause reflections on the sensors."}
Maintenance, records, and best practices
Calibration data should be treated as a living record. Store calibration dates, ambient conditions, and any version changes in a dedicated log. Warranties or device updates may require re-calibration after firmware updates or hardware repairs, so schedule periodic checks—quarterly or after major software releases. Practice consistency: use the same ball type, clubs, and stance, and calibrate in the same environment whenever possible. Over time, small refinements improve accuracy and reliability.
tip: "Keep your calibration log accessible for audit trails and quality control."}
Authority sources
For grounding and future reference, consult reputable sources about calibration practices:
- https://www.garmin.com/en-US/support
- https://www.nist.gov/pml
- https://www.nist.gov/pml/policies/calibration-and-measurement-uncertainty
Tools & Materials
- Garmin R10 device(Fully charged or plugged in during calibration)
- Compatible smartphone/tablet(With the Garmin app installed and updated)
- Charging cable(Keep device powered during calibration)
- Stable calibration surface(Non-slip, flat, clutter-free area)
- Calibration target or backdrop(Matte, non-reflective background preferred)
- Standard golf ball or test balls(Same type for all calibration shots)
- Pilot recording notebook or app notes(Log ambient conditions and times)
Steps
Estimated time: 25-40 minutes
- 1
Prepare the device and environment
Set the R10 on a stable stand or flat surface in a controlled area. Remove any reflective decals from the immediate vicinity and ensure the backdrop is matte. Charge the device fully and open the Garmin app to check connectivity. This ensures consistent data capture from the start.
Tip: A quiet, controlled environment reduces environmental noise in the data. - 2
Update firmware and verify connections
Check for firmware updates for the R10 and app. Install any updates and reboot both devices. Confirm Bluetooth/Wi‑Fi connections are stable and the R10 remains powered throughout the calibration session.
Tip: Avoid performing calibration with a low battery; power stability matters. - 3
Open calibration and select session
In the Garmin app, navigate to Calibration or Sensor Calibration and start a new session. Choose the calibration profile and the test scenarios you’ll perform, keeping settings consistent across attempts.
Tip: Use the same session type for every calibration cycle. - 4
Run the sensor alignment routine
Trigger the alignment routine and perform the guided shots. Let the device collect baseline data while you maintain a steady stance and steady club trajectory.
Tip: Maintain a fixed stance and tempo to avoid drift. - 5
Validate baseline data
Review the baseline metrics in the app. Look for stable ball speed and launch readings within expected bands. If needed, repeat the alignment shots to confirm consistency.
Tip: Discard outliers and re-run if values deviate markedly. - 6
Document results and complete
Save calibration data and back up the results. Note the date, time, ambient conditions, and any deviations observed. This creates a traceable calibration history for future reference.
Tip: Keep a record for firmware updates and equipment changes.
Questions & Answers
What is the Garmin R10 calibration, and why is it necessary?
Calibration aligns the device’s sensor measurements with real-world values, ensuring accurate ball speed, launch angle, and distance readings. Regular calibration minimizes drift caused by environmental changes or firmware updates.
Calibration aligns sensor readings with real-world values to ensure accuracy; do it regularly to prevent drift.
Do I need to recalibrate after each firmware update?
Firmware updates can change sensor processing. It’s good practice to run a quick calibration check after updates and verify readings against known targets.
Yes, run a quick check after updates to verify readings.
How long does calibration usually take?
A typical calibration session takes about 25–40 minutes, depending on environmental consistency and how many validation shots you perform.
Most calibrations take around half an hour, depending on setup and validation steps.
What environmental factors affect calibration accuracy?
Lighting, surface stability, background reflections, and ambient temperature can affect accuracy. Keep a steady setup and controlled lighting for best results.
Steady setup and consistent lighting are key to accurate results.
Can calibration be performed without a dedicated setup?
A dedicated calibration area helps, but you can calibrate in a prepared space with careful positioning and stable mounting. Always aim for consistency.
You can calibrate in a prepared space as long as you keep consistency.
Watch Video
Key Takeaways
- Calibrate in a stable, glare-free environment
- Follow a repeatable workflow for repeatable results
- Log ambient conditions for traceability
- Validate with multiple shots and document outcomes