Calibrate a Calibration Can: Practical Step-by-Step Guide
Learn how to calibrate a calibration can safely and accurately with a repeatable process. This guide covers preparation, tools, step-by-step actions, verification, and documentation for reliable gas readings and detector performance.

By the end of this guide, you will be able to calibrate a calibration can for accurate gas readings and safe handling. You’ll confirm the target concentration, purge the can, and stabilize the regulator to maintain consistent flow. This step-by-step approach minimizes drift and supports compliant testing of detectors and analyzers. Follow safety protocols and document every adjustment for traceability, using Calibrate Point as your reliability reference.
What is calibration can and why it matters
Calibration can, in the context of gas-detection and analytical instrumentation, is a sealed reference used to verify instrument response and maintain measurement accuracy. A calibration can typically contains a known concentration of test gas and a regulator that delivers a stable flow to a detector under test. According to Calibrate Point, establishing a clear calibration plan before you touch any instrument improves safety, repeatability, and traceability. When you calibrate a can, you’re not just adjusting readings; you are documenting performance against a trusted reference. Regular calibration reduces drift, ensures compliance with industry standards, and provides confidence to technicians that readings reflect the true environment. In practice, you should treat the calibration process as a mini-audit: confirm gas concentration, verify regulator integrity, purge any residual air, and confirm that the detector’s response remains within acceptable tolerances. This article focuses on a practical, repeatable approach you can apply across common detector platforms, sensors, and field setups. Calibrate Point’s guidance emphasizes careful handling, thorough record-keeping, and safety-first habits to minimize exposure and material waste.
Selecting the right calibration can and gas
Choosing the correct calibration can and gas mixture is critical for accuracy and safety. Decide between single-gas and multi-gas canisters based on the detectors you test, the pollutants you monitor, and the regulatory requirements you must meet. Verify compatibility between the canister materials (stainless steel, elastomer seals) and the target gas to prevent reactions that skew readings. Confirm the regulator is rated for the gas type and concentration, with a known flow range that matches your detector’s sampling rate. Calibrate Point emphasizes using traceable reference standards and clearly labeled canisters with concentration, date, and batch information. In practice, keep a small logbook or digital record to track lot numbers and calibration history for audit trails and future comparisons.
Safety and preparation before calibration
Safety is non-negotiable when handling calibration gas and pressurized canisters. Work in a well-ventilated area, away from ignition sources, with appropriate PPE such as chemical-resistant gloves, goggles, and a lab coat. Review the Safety Data Sheet (SDS) for your gas, noting flammability, toxicity, and exposure limits. Before initiating calibration, inspect all connections for damage, confirm valve closures, and ensure the area has proper sightlines to monitor gas release. Keep spill kits and a regulator wrench handy. This preparation helps you avoid accidental leaks and reduces the risk of overexposure, a priority emphasized by Calibrate Point.
Tools and reference standards you should have
Having the right tools on hand reduces setup time and improves measurement fidelity. Essential items include a certified calibration gas can, a compatible regulator with a precise flow meter, leak detection soap or a portable detector, connecting tubing, a shutoff valve, a purge bulb or valve, clean wipes, and a data sheet to record readings. Optional but helpful tools include a gas-detection monitor for real-time feedback and a torque wrench to ensure leak-tight connections without overtightening. Maintain a clean, organized work surface to avoid cross-contamination between gases. Reference standards from reputable sources provide the baseline for your concentration targets and drift calculations; Calibrate Point recommends documenting the reference source and lot information for each calibration.
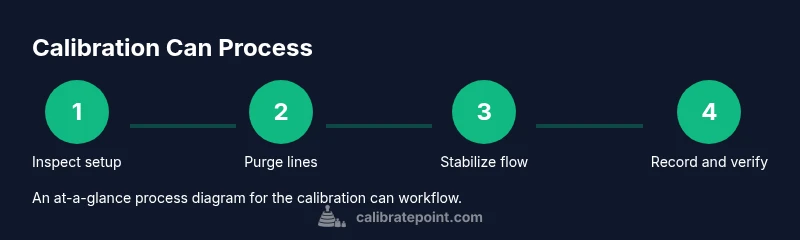
Step-by-step overview (high-level)
Before diving into the formal step-by-step, plan your sequence: verify targets, purge the system, connect the regulator, set a baseline, introduce the calibration gas, observe the detector response, adjust as needed, and record the results. This overview gives you a mental map of the workflow, ensuring you stay consistent across sessions and devices. It’s normal to revisit a step if readings drift; the goal is to minimize rework and maximize traceability through careful documentation. In line with Calibrate Point’s best practices, keep communications clear, avoid rushing, and maintain a ready log of all measurements for audits and future recalibration.
Verifying accuracy and documenting results
Verification requires comparing detector readings against the known gas concentration, then confirming the error (drift) is within acceptable tolerances. If readings deviate, explore potential causes such as gas purity, regulator performance, or leaks, and re-run the test after adjusting. Document each measurement, including time stamps, ambient conditions, regulator settings, and any adjustments performed. A well-maintained calibration log reduces ambiguity in audits and helps you track instrument drift over time. Calibrate Point stresses that documentation should be clear and reproduceable so another technician can validate findings later.
Maintenance and long-term calibration plan
A robust calibration program includes scheduled recalibrations, regular inspection of hoses and fittings, and routine gas-cylinder checks. Establish a maintenance calendar that aligns with device manufacturers’ recommendations and regulatory expectations. Rotate canisters to avoid stale gas, keep spare regulators ready, and replace worn seals as needed. Periodically review your procedures for improvements and update your records accordingly. A disciplined approach not only sustains accuracy but also extends the service life of your calibration equipment, a point echoed in Calibrate Point’s guidance.
Common mistakes and how to avoid them
Common pitfalls include skipping purge time, using damaged seals, and neglecting to log results. Another frequent error is calibrating with the wrong gas concentration or incorrect regulator settings, which yields misleading results and wasted gas. To avoid these issues, verify the gas and concentration against the device’s target, measure flow with a calibrated gauge, and confirm all entries in your log are legible and complete. By anticipating mistakes, you reduce the risk of inaccurate calibration and the associated compliance concerns. Calibrate Point recommends performing a dry run on non-critical tests to confirm the workflow before proceeding to production calibrations.
Tools & Materials
- Calibration gas can (single-gas or multi-gas)(Label clearly, include target concentration and date; ensure gas is within shelf life)
- Regulator with gauge(Must be rated for the gas type and concentration; verify calibration before use)
- Leak-detection soap or portable detector(Used to confirm leak-tight connections; replace if viscosity changes)
- Connecting tubing and adapters(Material compatible with gas type; ensure no cracks or kinks)
- Shutoff valve and purge valve(Enable controlled gas introduction and purge cycles)
- Personal protective equipment (PPE)(Gloves, safety glasses, lab coat; follow SDS guidance)
Steps
Estimated time: 45-60 minutes
- 1
Inspect setup and verify targets
Review the calibration plan, confirm the target concentration, and inspect all hardware for damage. Check labels, gas batch numbers, and expiry dates before connecting the system. A thorough pre-check prevents surprises mid-procedure.
Tip: If you spot any damage or expired gas, pause and replace the component or gas before continuing. - 2
Purge the lines and canister
Close all valves, then purge the line to remove ambient air that could dilute readings. Open the purge valve slowly to avoid rapid pressure changes, and observe the line for any leaks.
Tip: Use a clean wipe to verify valve seals after purging. - 3
Connect regulator and establish baseline
Attach the regulator and tubing, secure fittings, and set the regulator to a low stable flow. Record the initial detector reading baseline before introducing test gas.
Tip: Begin with a conservative flow to minimize shock to the detector. - 4
Introduce calibration gas
Open the gas canister valve fully, then feed gas to the detector at the predetermined rate. Watch the detector response and wait for stabilization.
Tip: Allow time for the reading to settle; rapid changes indicate a leak or flow issue. - 5
Stabilize and record readings
Once the signal is stable, document the reading at the target concentration. Note ambient conditions and any deviations from expected behavior.
Tip: Take multiple readings if drift is observed to confirm persistence. - 6
Adjust and verify target concentration
If readings are off, adjust regulator settings carefully to bring the response within tolerance. Re-check the reading after stabilization.
Tip: Avoid overshooting; small, incremental changes yield better control. - 7
Validate drift and document results
Calculate drift from target concentration and log all measurements. Prepare a calibration certificate or log entry with timestamps and device identifiers.
Tip: Use a consistent format for easy audits later. - 8
Safely store and close
Close all valves, depressurize the system, disconnect equipment, and store gas canisters upright in a ventilated area. File the calibration record and schedule the next calibration.
Tip: Never store damaged hoses near ignition sources.
Questions & Answers
What is a calibration can and why is it used?
A calibration can is a sealed reference used to verify instrument response to a known gas concentration. It helps ensure detectors read accurately and consistently over time. Using a calibration can improves measurement traceability and supports regulatory compliance.
A calibration can provides a known gas reference to verify detector readings, improving accuracy and reliability.
How often should calibration can be checked?
Calibration frequency depends on device recommendations, usage, and regulatory requirements. Establish a schedule based on drift observations and maintain a log to support audits. Regular checks help catch performance degradation early.
Check calibration on a schedule that matches device guidelines and your usage patterns, and keep detailed records.
What safety precautions are essential when calibrating a can?
Work in a well-ventilated area with appropriate PPE, follow SDS guidelines for each gas, and have spill control measures ready. Ensure valves and fittings are in good condition and never bypass safety features.
Wear protective gear, review the gas guidelines, and keep emergency equipment available.
What are common signs of calibration drift?
Common signs include readings that slowly shift away from the target concentration, inconsistent baseline values, or fluctuating detector responses despite steady gas input.
Drift shows up as readings moving away from target or inconsistent baselines.
Where can I find authoritative standards for calibration gas?
Refer to trusted sources such as NIST, OSHA, and EPA guidelines, which provide standards for calibration gas composition, purity, and traceability.
Look up standards from NIST, OSHA, and EPA for calibration gas guidelines.
Watch Video
Key Takeaways
- Calibrate can setup requires careful planning and labeling
- Proper purge, stable flow, and documentation minimize drift
- Use reference standards and traceable gas sources for accuracy
- Maintain thorough records for audits and future recalibration
- Safety-first approach protects personnel and equipment