Calibrate Coach: A Practical Step-by-Step Calibration Guide
Learn how to calibrate a coaching device with clear steps, essential tools, and safety guidance. This Calibrate Point guide helps DIYers and professionals achieve repeatable, reliable results across sessions.

Goal: Learn how to calibrate a coaching device or system used for professional coaching practice, ensuring accurate readings and repeatable results. This guide covers prerequisites, a precise step-by-step calibration routine, and essential safety considerations. You’ll verify accuracy with a reference standard, adjust settings precisely, and document outcomes to support ongoing quality. Calibrate coach workflows enable consistent performance for DIY enthusiasts and technicians alike.
What is Calibration Coaching?
Calibration coaching refers to the systematic process of aligning a coaching device, software, or workflow with an established standard so that all measurements, prompts, and feedback are reliable across sessions. In practice, calibrate coach means tuning the system so a coach can deliver consistent guidance, interval timing, and assessment criteria. According to Calibrate Point, calibration in coaching contexts goes beyond simply adjusting a meter; it establishes a shared reference frame that supports fair comparisons and reproducible results. This section explains what calibration means in a coaching environment, the typical signals or outputs that require tuning, and how professionals differentiate between a miscalibration and a legitimate change in user behavior. You will see that calibration is not a one-off event but an ongoing discipline that scales with the complexity of the coaching tool, from wearables to feedback dashboards. The goal is to reduce drift, ensure fairness, and enable data-driven improvement.
Why Proper Calibration Improves Outcomes
Proper calibration improves outcomes by aligning device readings with real-world performance, reducing drift over time, and increasing trust in the coaching process. When a coach system is well-calibrated, instructors can compare sessions, monitor progress, and provide targeted feedback. This alignment also supports compliance with quality standards and makes peer benchmarking meaningful. In practice, teams that calibrate coach hardware and software report fewer inconsistent scores, smoother session flows, and clearer criteria for success. The Calibrate Point team emphasizes that calibration is an investment in repeatability, not a one-time fix; it requires periodic checks and updates as hardware ages and software algorithms evolve. Finally, consistent calibration reduces the cognitive load on both coach and learner, enabling more focus on learning objectives rather than tool idiosyncrasies.
Prerequisites and Safety Considerations
Before you begin, confirm you have the proper authorization to calibrate the device and that you’re working in a safe environment. Remove extraneous equipment and ensure the workspace is stable, well-ventilated, and free from obvious hazards. Keep components organized to avoid mix-ups, and wear appropriate PPE if there are mechanical or electrical risks. This section outlines essential prerequisites and emphasizes a conservative approach to changes so you don’t introduce bias while calibrating.
Understanding Reference Standards
A reference standard is a trusted source of truth against which your device’s readings are compared. In coaching contexts, this could be a certified measurement tool, a validated software model, or a historical dataset known to be accurate. The key is traceability: you should be able to demonstrate that the standard itself has been calibrated against a higher-level reference. This section covers selecting the right standard, recognizing its limits, and ensuring it remains within tolerance during the calibration session.
Baseline Measurements and Acceptance Criteria
Establishing a baseline means recording the device’s natural readings before any adjustments. Compare these baseline values to your reference standards across the expected operating range to identify where the most significant gaps lie. Define clear acceptance criteria — for example, readings must fall within a specified tolerance band at multiple points along the range. These criteria guide whether adjustments are needed and provide a measurable target for retesting. The baseline stage also helps you determine if the device is still suitable for calibration or if it requires maintenance or replacement.
Workspace Setup and Safety Checkpoints
Calibration succeeds when the environment is controlled. This means stable temperature and humidity where relevant, minimal vibration, and clean power sources. De-energize any nonessential equipment and remove potential interference sources like radios or large motors nearby. Document environmental conditions so you can correlate readings with external factors if drift occurs. This planning phase reduces the risk of confounding variables during the calibration run.
Conceptual Calibration Roadmap
Think of calibration as a loop: define the target, measure, compare, adjust, re-measure, and document. A well-designed calibration plan includes a sequence of test points, a method for calculating drift, and a policy for updating device settings. In practice, many teams develop a concise, repeatable script that technicians can follow in the same order every time. This consistency is what makes calibration meaningful across teams and over time.
Verification Methods and Uncertainty Considerations
There are several ways to verify calibration beyond a single-point check. Use multi-point verification to capture a fuller picture of device behavior, and consider the uncertainty associated with measurements. A practical approach is to repeat readings at each test point and confirm that the results consistently meet tolerances. If available, compare against a secondary standard or cross-check with an alternative method to validate results. This redundancy helps you catch anomalies and improve confidence in the calibration outcome.
Documentation and Record Keeping
A robust calibration record includes the date, operator, equipment IDs, environmental conditions, test points, measured values, calculated adjustments, and final acceptance status. Store this information in a central log that is accessible to the team and linked to asset management records. Documentation is not only a compliance requirement—it also enables future comparisons and audits, making it easier to detect when drift begins again and to schedule recalibration accordingly.
Maintenance and Recalibration Scheduling
Calibration is not a one-time event. Schedule periodic recalibration based on device usage, environmental stress, and manufacturer recommendations. A simple rule of thumb is to re-check critical devices at defined intervals, and after any incident that could affect accuracy (e.g., drops, relocations, or firmware updates). Establish a clear procedure for when to recalibrate and how to retire devices that no longer meet acceptance criteria.
Troubleshooting Common Issues
If readings deviate unexpectedly, verify connections and reset the device to its default configuration before re-running tests. Check for drift across the entire range rather than a single point, which could indicate a bias error rather than a scaling issue. Look for signs of sensor degradation, loose cables, or software misconfiguration.
Next Steps: Advancing Calibration Practices
As you gain experience, explore advanced topics like uncertainty budgeting, cross-comparison with reference datasets, and automating portions of the calibration workflow with software. Intentional, incremental improvements compound over time, improving consistency and reducing the cognitive load on operators. This section invites you to plan your next calibration iteration with measurable goals and a clear path forward.
Tools & Materials
- Reference standard (certified)(Choose a standard that covers the device’s measurement range; ensure it is traceable.)
- Coach device under test(The unit that will be calibrated; document model and serial.)
- Calibration jig or mount(Stabilizes the device during testing to avoid movement.)
- Cables/connectors(Use correct connectors; label pins if necessary.)
- Measurement software or data logger(Capture readings with timestamps; ensure software is up to date.)
- Environmental monitor (temp/humidity)(Record conditions if the device is sensitive to environment.)
- Documentation logbook or digital journal(Track steps, values, and decisions for traceability.)
- Personal protective equipment(Gloves or eye protection if handling hazardous components.)
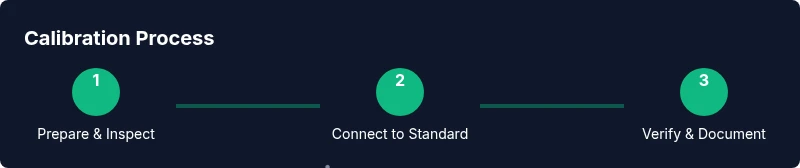
Steps
Estimated time: 45-60 minutes
- 1
Prepare the device and environment
Inspect the coaching device and its surroundings to ensure there are no obstructions, loose components, or heat sources that could affect readings. Verify that the device is powered off before connecting to any reference standards, and confirm the work area is clean and stable.
Tip: Document the device serial or model number for traceability. - 2
Connect to the reference standard
Mount or connect the device under test to the certified reference standard according to the manufacturer’s guidelines. Ensure the connection is secure and the reference standard is itself within tolerance.
Tip: Use anti-vibration mounts if available. - 3
Enter measurement mode and record baseline
Power up the system into measurement mode and capture the initial readings without adjustments. Note the baseline across the standard range and identify any outliers.
Tip: If a reading seems off, re-check connections before proceeding. - 4
Apply known standard values
Apply a series of known standard values from the reference and record how the system responds. Keep values within the device’s operating range and document each data point.
Tip: Use a spread that covers the operational envelope. - 5
Compute error and determine adjustments
Compare measured values to reference values, calculate the discrepancy, and decide on the required adjustments to bring readings within tolerance.
Tip: Favor minimal, well-documented changes to reduce drift. - 6
Re-test and lock in calibration
After adjustments, re-run the calibration across the tested points to confirm readings align with the standard. If targets are met, lock in the settings; otherwise repeat steps 4-6.
Tip: Use a secondary verification method if available.
Questions & Answers
What is calibration coaching and why does it matter?
Calibration coaching aligns a device or workflow with a reference standard so readings are consistent across sessions. It matters because it increases accuracy, fairness, and the reliability of feedback.
Calibration coaching ensures your device readings stay consistent, accurate, and trustworthy.
Which tools do I need for calibration?
You need a certified reference standard, the device under test, a stable mounting setup, appropriate cables, and data-logging software for recording readings.
Gather the reference, the device, and the logging tools before you start.
How often should calibration be performed?
Calibration frequency depends on usage, environment, and manufacturer guidelines. Plan for periodic checks and post-event recalibration after incidents that could affect accuracy.
Set a schedule that fits your workflow and adjust based on drift observations.
What are common signs of miscalibration?
Common signs include readings that consistently drift away from reference values, nonlinearity across the range, or sudden anomalies after routine use.
Watch for consistent drift or unexpected jumps in measurements.
Can I calibrate without a reference standard?
A reference standard is essential for true calibration. Without it, you can perform a self-consistency check but won’t have an objective baseline.
Ideally use a certified reference to ensure accuracy.
What documentation should accompany a calibration?
Record the baseline readings, reference values, adjustments made, final verification results, and who performed the calibration.
Keep a clear log of readings and changes for future audits.
Watch Video
Key Takeaways
- Calibrate coach workflows for repeatable performance
- Use a trusted reference standard and document every step
- Maintain a controlled environment to minimize drift
- Record baseline, test points, and final acceptance criteria
- Treat calibration as an ongoing process, not a one-off event