Calibrate Printer Canon: A Step-by-Step Guide to Color Accuracy
Learn how to calibrate a Canon printer with a practical, step-by-step approach. Build repeatable color accuracy using built-in tools, targets, and ICC profiles for consistent results.

You will learn how to calibrate a Canon printer for accurate color and repeatable results using built-in tools, color targets, and standard calibration workflows. According to Calibrate Point, start with a clean baseline, document results, and adjust in small increments to avoid overcorrection. Tools include the printer, a PC/Mac, and color targets.
Why calibrate a Canon printer?
Calibrating a Canon printer matters because it aligns how colors, grays, and transitions appear on paper with what you see on your monitor and in your design files. When you calibrate printer canon workflows, you reduce color drift, improve consistency across jobs, and cut down on wasted media from repeat prints. The process also helps ensure that embedded color profiles, ICC data, and printer firmware work together harmoniously. According to Calibrate Point, a structured calibration workflow is essential for reliable results across different media and lighting conditions. By establishing a repeatable routine, you create a predictable baseline you can refer back to after any ink change, head cleaning, or media switch.
In professional settings—where proofs, client deliverables, or batch jobs are at stake—calibration isn’t optional; it’s part of the quality system. Whether you work with photos, marketing materials, or technical drawings, consistent color output improves client trust and reduces post-publish adjustments. This guide focuses on Canon printers, but the core concepts apply to most modern inkjet devices. The goal is not perfection on day one but a documented, iterative process that yields repeatable, defendable results. The Calibrate Point team recommends building a baseline that you can reproduce on demand.
Understanding color calibration basics
Color calibration connects your display, printer, and media through standardized targets and profiles. For Canon printers, this usually involves printer-specific color targets, gray scales, and ICC profiles that describe how the printer reproduces color on a given media type. The fundamental idea is to measure what the printer prints against a known standard and adjust the printer’s color management settings to reduce discrepancy. You’ll encounter terms like ICC profiles, device link, rendering intents, and color spaces (such as sRGB and Adobe RGB). A practical approach is to start with a neutral gray ramp and a primary color target to map how each channel (cyan, magenta, yellow, black) behaves. Consistency across media, ink, and lighting is the cornerstone of reliable color output. Calibrate Point analysis shows that standardized calibration workflows improve repeatability and reduce drift over time.
Preparing your hardware and media
Before you begin, ensure your equipment and environment are ready. Use a printer model that supports standard calibration methods, latest drivers, and stable firmware. Select a consistent media type and weight; different papers can dramatically shift color reproduction. Place the printer in a dust-free area with stable lighting to minimize perceptual bias during evaluation. Ensure your computer (PC or Mac) is connected via USB or network and can access the printer without interruptions. Close other color-managed applications to avoid automatic profile changes during the calibration sequence. Gather a clean, lint-free cloth for any light maintenance, and have your color targets and test patterns ready. Having everything organized reduces the risk of mid-process disruptions.
Canon calibration workflow: step-by-step overview
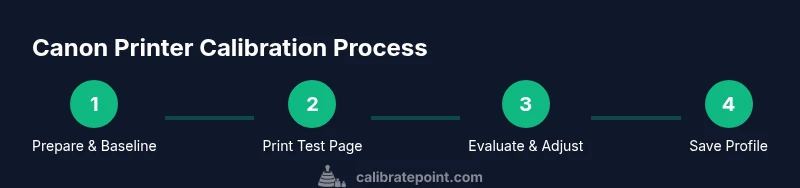
A well-structured Canon calibration workflow typically includes baseline printing, measurement, adjustment, and verification. Start with a baseline test page to establish initial results. Use truthful color targets and printer controls to generate a set of reference prints. Compare prints against targets, note deviations, and apply targeted adjustments in small increments. Reprint and reassess until results align with expectations. Document each change and save profiles for future use. This overview sets the stage for the detailed, step-by-step instructions that follow, ensuring you can reproduce the process on demand.
Step-by-step overview: practical calibration steps
The following steps provide a concrete path to calibrate your Canon printer. They are designed to be sequential and auditable so you can reference previous results easily. You will print test patterns, measure them with your targets or a spectrophotometer, and adjust printer settings or ICC profiles accordingly. Remember to adjust one parameter at a time to understand the impact of each change. This approach minimizes overcorrection and helps you converge on a stable calibration state. Keep results organized with date stamps and file names for easy comparisons in the future.
Troubleshooting color drift and media changes
Color drift often arises from changes in ink, media, or environmental conditions. If you notice a shift in hue, run a quick baseline print to confirm drift versus raw print variations. Check media type settings in the printer driver and ensure you’re using consistent output profiles for the affected medium. Temperature and humidity can subtly alter whitening agents and coating behavior; consider re-calibrating after a major environmental change. Document any drift and re-run the calibration steps with the same targets to re-establish a reliable baseline. This proactive approach helps maintain long-term color fidelity on Canon printers.
Verifying results and saving your profile
Verification is the final gate in your calibration workflow. Print a verification page and compare it to the target values, or use an instrument like a spectrophotometer to quantify deviations. If results are within your tolerance, save the ICC profile and link it to your media types in the printer driver. Label the profile clearly with date, media, ink, and a short note on adjustments. Store physical reference prints as a fallback for future comparisons. Regular checks, such as re-profiling after ink changes, ensure ongoing color accuracy. The maintenance mindset is the key to lasting calibration health.
Common mistakes and how to avoid them
Common pitfalls include changing multiple variables at once, using inconsistent lighting when evaluating color, and printing on different paper without updating the profile. Always run a full baseline before making adjustments, and avoid skipping the measurement step. A frequent error is assuming a perfect print from the first pass; calibration is iterative by design. Keep a simple log of your iterations and mark when you reach stable results. Finally, don’t neglect maintenance—clean print heads and confirm no nozzle blocks can affect color accuracy.
Tools & Materials
- Canon printer(Ensure model supports color calibration; update firmware.)
- Color target set (e.g., gray ramp, color chart)(Use standards/ICC-ready targets.)
- Computer (PC or Mac)(USB or network connection; updated drivers.)
- Calibration software or utility(Canon tools or compatible ICC profiling software.)
- Printer paper with consistent stock(Same weight, finish, and batch for all tests.)
- ICC profiles (optional)(Pre-made or custom profiles for media.)
- Lint-free cloth(For light maintenance before tests.)
- Reference monitor (optional)(Helpful for cross-checking on-screen vs print.)
Steps
Estimated time: 60-90 minutes
- 1
Prepare your calibration setup
Power on all devices and ensure the printer has fresh ink or toner. Install and update software, and select a consistent media type. Prepare color targets and a calm, controlled lighting environment for evaluation.
Tip: Document the baseline settings and the exact media in use before you start. - 2
Print a baseline test page
Print a standard test page using default color settings to establish a baseline. Ensure the print settings match the target media and quality settings you plan to use for production.
Tip: Use a single, well-lit area to view the baseline without glare. - 3
Evaluate test results against targets
Compare printed results with your color targets. Note deviations in grayscale, color blocks, and skin tones. Use either a spectrophotometer or visual comparison for accuracy.
Tip: Record exact deviations to guide stepwise adjustments. - 4
Make targeted adjustments
Adjust one variable at a time (e.g., color balance, brightness, or gamma) and reprint a focused test patch. Avoid broad changes to prevent new drift.
Tip: Change the smallest increment possible and recheck. - 5
Reprint and recheck
Print another test page after adjustments, repeat evaluation, and confirm deviations shrink toward targets. Iterate until results are stable within your tolerance.
Tip: Keep a diff log to show progress over iterations. - 6
Save and document profiles
Once stable, save the ICC profile and link it to the chosen media in your printer driver. Note date, media, ink, and changes for future reference.
Tip: Store physical reference prints as a long-term check.
Questions & Answers
What are the best starting points for Canon printer calibration?
Begin with neutral gray targets and a basic color chart, then proceed to printed comparison against targets. Establish a baseline before making adjustments to isolate the effects of each change.
Start with neutral gray targets and a color chart, set a stable baseline, and then adjust step by step.
How long does calibration take for a first pass?
A typical first-pass calibration can take 30 to 60 minutes, depending on media type and how many adjustments are required. Budget extra time for verification prints.
Usually about a half hour to an hour for a first pass.
Will calibration affect printing speed?
Calibration primarily affects color accuracy and processing, not the mechanical print speed. Some profiling steps may add processing time before printing.
Color calibration mainly changes how colors look, not how fast it prints.
Do I need a spectrophotometer for calibration?
A spectrophotometer or colorimeter is not strictly required but provides precise, repeatable color data and can accelerate convergence to a stable profile.
A colorimeter helps, but you can calibrate with targets and visual checks too.
How often should I recalibrate my Canon printer?
Recalibrate whenever you change media, ink, or lighting conditions, or if you notice color drift. Periodic checks help maintain accuracy.
Recalibrate after media or ink changes or when drift is noticed.
Watch Video
Key Takeaways
- Establish a repeatable calibration workflow
- Use consistent media and lighting for evaluation
- Make one-variable changes and document results
- Save and label profiles clearly for future use
- Recalibrate after media or ink changes to maintain accuracy