Where is the Calibrate Tool in Bluebeam: A Practical Guide
Learn exactly where to find the calibrate tool in Bluebeam Revu, with step-by-step instructions, tips for all versions, and best practices to ensure accurate scale calibration in PDFs.

To locate the calibrate tool in Bluebeam, open the Measurements panel from the Tool Chest, then select Calibration from the sub-menu. Ensure the document has a valid scale and that you’re using a recent Bluebeam version. If Calibration isn’t visible, customize the Tool Chest to enable advanced measurement tools. This quick path gets you ready to calibrate scales and verify measurements quickly.
where is the calibrate tool in bluebeam
If you’re tackling PDF drawings in Bluebeam Revu, knowing where the calibrate tool lives is essential for accurate scaling. In practice, the calibrate tool is part of the Measurements toolset and is most often accessed from the Tool Chest within a given document. According to Calibrate Point, most users start by locating the Measurements panel in the Revu interface and then revealing Calibration as a sub-option. In this guide, you’ll learn to identify the right panel, enable the proper toolset, and verify that your document is ready for calibration. We’ll cover differences across Bluebeam versions, how to customize the Tool Chest for faster access, and how to prevent common mistakes that break scale accuracy. This article answers where is the calibrate tool in bluebeam and how to access it, so you can maintain measurement fidelity across complex drawings. The calibration workflow is a foundational skill for anyone who relies on precise PDF-based measurements, from field technicians to design professionals.
The Calibrate Tool is not an isolated feature; it exists within a broader measurement ecosystem in Bluebeam Revu. Before diving into the steps, it helps to understand how the Calibration option interacts with existing scales, rulers, and the grid system. If your document lacks a defined scale, you’ll need to establish one (or confirm an established scale in the document metadata) before calibration can yield meaningful results. When you locate the tool, you’ll gain access to a calibrated measurement baseline that underpins all subsequent distance and area calculations. This is especially important for project bids, fabrication tolerances, and QA workflows where precision matters.
Understanding Bluebeam's measurement workflow
Bluebeam Revu provides a robust measurement suite designed to handle scaling, area calculations, and proportional checks across multi-page PDFs. The calibrate tool is intimately tied to the document’s scale data, so the first step is to verify that the PDF contains a reliable scale line or known distance. In practice, practitioners often use the Measurement panel to access both Scale and Calibration options. If you’re asking where is the calibrate tool in bluebeam in a specific version, remember that the exact location can shift slightly between major releases. The common thread is that Calibration resides within the Measurements tool family, typically under a sub-menu labeled Calibration or a related option like Calibrate. In some configurations, you may need to enable advanced measurement tools to expose this function in the Tool Chest. This section also covers how to interpret calibration results, how to adjust for print scaling, and how to use the scale data to validate mockups, drawings, and as-built PDFs.
Understanding the measurement workflow also means recognizing the difference between calibrating a drawing’s scale and measuring with an already calibrated scale. You’ll frequently see users confuse calibration with measurement itself. Calibrate focuses on ensuring that a known distance on the drawing corresponds to a defined real-world distance, while measurements compute lengths based on that established scale. As you proceed, keep in mind that consistent use of calibrated scales enables more accurate bill-of-materials calculations, quantity takeoffs, and QA checks.
Verifying calibration and troubleshooting common issues
Once you’ve located the calibrate tool and run an initial calibration, verification is critical. A successful calibration should yield a known distance that matches the real-world dimension within an acceptable tolerance. If the result doesn’t align, recheck the source data: confirm the scale line is on the same page as your measurement, verify page scaling (print-to-PDF settings can alter scale), and ensure you didn’t accidentally calibrate using a non-planar element (like an angled line). In this section, you’ll learn how to test calibration with multiple known distances, how to audit for page-specific scale variability, and how to reset calibration to a clean baseline. The goal is to establish a repeatable routine that yields trustworthy measurements across project lifecycles.
From a workflow perspective, always document the calibration parameters in your project notes. If you’re collaborating, share the calibration baseline with teammates so everyone uses the same reference. Finally, remember that calibration isn’t a one-off task; it’s an ongoing practice that underpins quality control in drawing reviews, quantity surveys, and field handoffs.
Version-aware notes: differences across Bluebeam versions
Bluebeam Revu has evolved its measurement tools over time, and the path to the calibrate tool can differ slightly by version. In older releases, Calibration might be tucked under the Measurements toolset’s extended options; in newer updates, it may appear as a dedicated Calibration button within the Tool Chest or a context menu when you select a scale line. This section compares common version differences, outlines steps to surface the tool in legacy environments, and provides version-agnostic advice: verify the scale first, ensure you’re in the Measurements domain, and enable advanced tools if needed. If you’re unsure which version you’re using, access Help > About Bluebeam Revu to confirm features and availability.
Practical tip: on multi-user projects, confirm that all team members share the same calibration baseline file or annotation set so that measurements align across documents. This minimizes discrepancies when drawing sets are reviewed, printed, or exported to other formats.
Customizing for speed: Tool Chest, Profiles, and presets
Efficiency matters when you frequently calibrate drawings across dozens of pages. This section explains how to customize the Tool Chest to keep Calibration accessible, how to save a Calibration profile, and how to assign a keyboard shortcut where supported. You’ll also learn how to build a small profile that combines Scale, Calibration, and a few commonly used measurement tools into one workflow. The result is a faster, more reliable calibration routine that reduces repetitive clicks and the chance of selecting the wrong tool. We also discuss best practices for organizing your tool sets in shared workflow environments to support consistent calibration results across projects.
Authority sources and further reading
For readers who want to deepen their understanding of measurement accuracy and calibration concepts, several credible sources provide foundational context. This section offers curated references to help you validate your approach and extend your knowledge beyond Bluebeam. Examples include general measurement standards, PDF workflow guidelines, and calibration theory that applies to digital drawings. Including authoritative sources in your notes helps ensure your calibration practice remains aligned with industry expectations and best practices.
Authority sources
- https://www.nist.gov/
- https://www.osha.gov/
- https://www.adobe.com/
Tools & Materials
- Bluebeam Revu (latest or recent version)(Ensure it includes the Calibration/Measurements tools in the toolset)
- PDF document with a defined scale(Prefer drawings with a clearly labeled scale (e.g., 1 inch = 10 feet))
- Mouse/keyboard or trackpad(For precise tool selection and navigation)
- Tool Chest customization access(Needed to expose advanced measurement tools if not visible by default)
- Calibration notes template(Optional: keep a small log of scale values and results)
Steps
Estimated time: 20-45 minutes
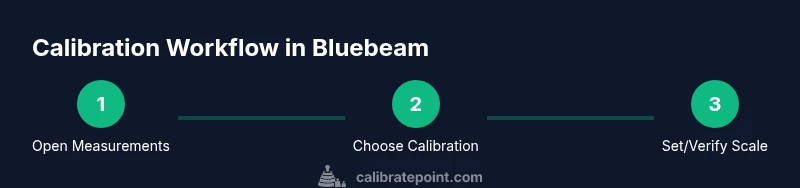
- 1
Open Measurements toolset
Launch Bluebeam Revu and open the target PDF. Access the Tool Chest and locate the Measurements toolset. This is your entry point for all calibration actions and related measurements.
Tip: If you don’t see Measurements, enable advanced tools in Preferences or switch to a different profile that includes measurement tools. - 2
Choose Calibration from the sub-menu
Within Measurements, select Calibration from the sub-menu or panel. If Calibration isn’t visible, customize the Tool Chest to reveal advanced measurements.
Tip: Use the Quick Access menu to pin Calibration for faster access in future sessions. - 3
Confirm or set a document scale
Verify that the PDF has a defined scale. If not, select a known distance on the drawing and input the real-world length to establish the baseline.
Tip: Use a clearly labeled scale bar or a standard dimension to minimize error. - 4
Calibrate against a known distance
Click to measure a known distance on the drawing, then input the actual real-world length. The software will align its internal scale to match that reference.
Tip: Choose a measurement that is long enough to be accurate but not distorted by page edges. - 5
Test the calibration with additional references
Measure other known distances to verify consistency. Adjust if needed, re-calibrating until measurements align within the tolerance you require.
Tip: Document any adjustments made for future reference. - 6
Save and reuse calibration settings
Save the calibrated scale as a preset or profile so future drawings inherit the same baseline. This promotes consistency across projects.
Tip: Label presets clearly (e.g., ‘Project X – 1 in = 10 ft’) for quick retrieval. - 7
Review version-specific nuances
Adjust steps if you’re on an older or newer Bluebeam release, as UI layouts may shift slightly between versions.
Tip: Consult the Help > About Bluebeam Revu to confirm feature availability before starting.
Questions & Answers
What is the calibrate tool in Bluebeam used for?
The calibrate tool aligns a drawing’s measured distances with real-world values by establishing or adjusting the scale. It ensures that subsequent measurements reflect accurate proportions across pages and sheets.
The calibrate tool aligns a drawing’s measurements with real-world values to ensure accurate proportions across pages.
Why can't I see the calibrate tool in Bluebeam?
The tool may be hidden in the Tool Chest or require enabling advanced measurement tools. Check Preferences and switch to a profile that includes the Calibration option in the Measurements group.
If you can’t see it, check the Tool Chest and enable advanced measurement tools in Preferences.
Can I calibrate multiple drawings in one session?
Yes. After calibrating one document, you can save the calibration as a preset and apply it to other drawings within the same project. This ensures consistency and saves time.
You can save a calibration preset and apply it to other drawings for consistency.
Does Bluebeam require a known scale to calibrate?
A known scale is essential for meaningful calibration. Without a reference distance, the tool cannot map measured values to real-world lengths accurately.
A known scale is required for calibration to be meaningful.
How do I save calibration settings for future files?
Create a calibration preset within the Measurements tool, name it clearly, and enable its automatic application to new documents when appropriate.
Create and save a calibration preset for future use.
Is there a keyboard shortcut for Calibration?
Shortcut availability varies by version and profile. Check your keyboard customization options in Preferences to assign a quick key to Calibration if supported.
Check preferences to assign a shortcut if your version supports it.
Watch Video
Key Takeaways
- Identify the Calibration option inside the Measurements toolset.
- Always start with a reliable scale reference before calibration.
- Use presets to apply the same calibration across multiple drawings.
- Verify results with multiple known distances for accuracy.