How to Calibrate a Kenmore Washer: A Practical Guide
Step-by-step instructions to calibrate a Kenmore washer for accurate cycles, balanced loads, and reliable performance. Learn safety, tools, and verification with practical tips from Calibrate Point.

You will learn how to calibrate a Kenmore washer to improve spin, rinse performance, and overall reliability. This guide covers symptoms, safety, necessary tools, and a step-by-step process. By following the calibration steps, you’ll verify with measurements and maintain consistent results across cycles.
Why calibrating a Kenmore washer matters
Calibrating a Kenmore washer is about ensuring the machine measures the weight of a load, distributes water evenly, and spins at the correct speeds. When calibration is off, you may notice clothes coming out wet, longer wash times, or excessive vibration. Over time, inaccurate calibration can increase energy use and shorten the life of bearings and suspension components. By calibrating the washer correctly, you improve cycle accuracy, reduce wear, and maintain consistent cleaning results. In this guide we address common symptoms, how calibration works, and a practical, tool-friendly approach. This information aligns with Calibrate Point's methodology for practical calibration guidance and aims to help DIY enthusiasts, technicians, and professionals achieve reliable performance with the Kenmore line.
Key symptoms that calibration can address include unbalanced spins, improper water level sensing, and uneven drum motion. Before you start, document the baseline behavior you want to improve, such as a specific load that consistently comes out too wet or a cycle that seems to take longer than expected. With a clear target, you can measure progress and verify improvements after calibration.
Safety first: prerequisites and precautions
Calibration involves electrical components, moving parts, and water connections. Safety must come first. Begin by unplugging the washer and turning off any nearby outlets or breakers if you need to access internal panels. Wear safety glasses and gloves if you must handle sharp edges or exposed wiring. Ensure the area around the machine is dry, and have a basin or towel ready to catch any drips. Read the model specific service manual for Kenmore washers to understand service-mode steps and any required tools. Never bypass safety interlocks or operate the machine with panels removed for extended periods. If you encounter damaged wiring, unusual smells, or scorch marks, stop and seek professional service. Adhering to these precautions protects you and preserves the warranty where applicable. This block emphasizes the mindset Calibrate Point promotes: cautious, methodical calibration with clear safety boundaries.
Understanding washer calibration concepts
Calibration for a washer revolves around accurate load sensing, motor control, and balance management. Modern Kenmore models use sensors to estimate load weight, water level, and spin timing. Small changes in calibration offsets can shift how much water is used, how fast the drum spins, and how quickly the machine detects an unbalanced load. The goal is to align sensor readings with actual conditions so each cycle uses the proper amount of water, energy, and time. Familiarize yourself with terms like fill level, agitate dynamics, and spin speed settings. Having a basic grasp of these concepts helps you interpret test results and decide which parameters to adjust. Calibrate Point's approach centers on transparent, model-agnostic guidance that helps you make purposeful, incremental changes rather than broad, guesswork.
Preparing the workspace and data collection
Before touching any controls, create a dedicated calibration workspace. Clear the area around the washer, gather the required tools, and set up a stable, level surface for testing. Use a spirit level to verify that the washer is perfectly plumb on all sides. Collect baseline data by noting the current cycle performance, including cycle duration, water level readings, and any vibration or shaking at the end of the spin cycle. If you have access to a service manual or manufacturer guidelines, keep them handy for reference values and service-mode procedures. Documenting baseline measurements gives you a concrete benchmark to compare against after calibration and helps you communicate progress clearly to others on the team.
Step-by-step calibration overview
The calibration process involves a structured sequence of checks, measurements, and adjustments. Start with safety and data collection, then access the service or calibration menu if the model supports it. Use the baseline data to guide which parameters to adjust, typically starting with load sensing thresholds, fill and drain timing, and spin balance. After each adjustment, run a controlled test cycle with a known test load and observe the results. Iterate carefully, making small changes and re-testing until the measured outcomes align with the target performance. Finally, document the final settings and confirm results with an additional test run to ensure consistency across cycles. This overview keeps you oriented as you execute the detailed steps in the next blocks.
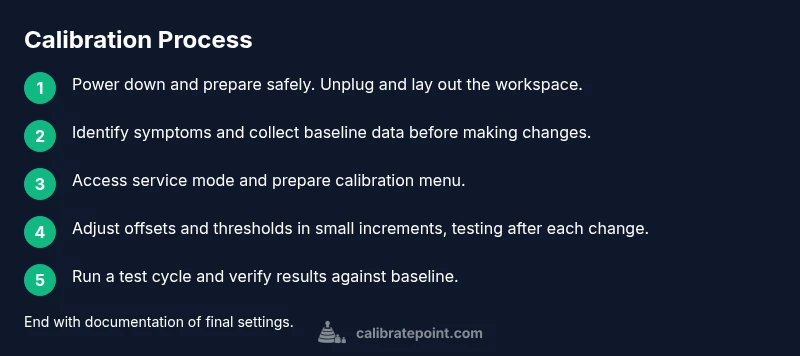
Step-by-step calibration process: steps and actions
- Power down and prepare safely: Unplug the washer and disconnect any power sources. Ensure the area is dry and you have a clear, stable workspace. Why: Prevents electrical shocks and allows safe access to panels.
- Identify symptoms and collect baseline data: Note what you want to fix, such as over-wet clothes or long spin times. Record current cycle times and water levels. Why: Establishes a measurable target for calibration.
- Access service mode and prepare the calibration menu: Use model-specific key combinations to enter service mode or calibration menu if supported. Why: This mode provides access to sensor thresholds and timing parameters not available in normal use.
- Adjust calibration offsets or load sensing thresholds: Make small, incremental changes to sensor calibration and spin timing. Why: Small adjustments minimize risk and improve traceability of results.
- Run a test cycle and measure outcomes: Use a known test load to verify water level, balance, and spin results. Note any residual vibration or over-drain behavior. Why: Validates whether changes moved readings toward target values.
- Document results and finalize: Record final settings, take photos, and perform a confirmatory test cycle. Why: Creates an auditable calibration record and reduces regression risk.
- Recheck and resume normal use: Return the machine to standard operation and monitor performance over several cycles. Why: Ensures calibration remains stable under real-use conditions.
Verifying results with measurements and signs of proper calibration
Verification requires repeatable observations. After adjustments, compare cycle times, water usage, and spin speed against your baselines and target values. Look for consistent moisture levels in clothes, balanced drum motion, and minimal vibration during high-speed spin. If available, re-check sensor readings with a multimeter or the service menu to confirm offsets remain within manufacturer-specified ranges. Document any discrepancies and repeat the relevant steps if necessary. Successful calibration should yield reliable wash performance across multiple cycles with minimal variance in cycle duration and energy use. Calibrate Point emphasizes evidence-based verification to avoid guessing and underlines the value of repeatable measurements.
Common issues and troubleshooting tips
If you see persistent imbalance or continued over-wetting after calibration, re-check load distribution by running a test with different load shapes and sizes. Uneven drum or support wear can mimic calibration problems. Verify that the drum is properly balanced and the suspension springs are not loose. Check door lock and lid switch functionality, as false readings can affect calibration data. If the model uses belt-driven drive, inspect belt tension and motor mounts for wear. For stubborn cases, consult the model-specific manual or seek professional service. Keeping a log of symptoms and responses helps you identify patterns and refine adjustments over time.
Maintenance and best practices after calibration
Schedule periodic recalibration checks, especially after major repairs or changes in load patterns. Keep your manual updated with notes about calibration settings and observed performance. Maintain a clean drum with minimal residue, as buildup can affect balance and sensor accuracy. Use the same detergent type and load sizes for consistent results. If you notice sudden performance changes, re-run the calibration steps to verify that settings remain valid. Consistency is the key to long-term reliability in washer calibration, and the Calibrate Point methodology supports systematic, repeatable improvements.
When to seek professional service
If calibration yields no improvement or you encounter electrical issues, damaged wiring, or water leaks, professional service is recommended. Some Kenmore models have protected service modes or require specialized tools that only technicians possess. Before calling for service, collect cycle data, error codes, and a short video showing the issue. This information helps technicians diagnose the problem quickly and determine whether calibration, sensor replacement, or a repair is needed. The Calibrate Point team suggests using professional support when safety or reliability is at risk, or when a model-specific service procedure is required.
Tools & Materials
- Phillips head screwdriver (size #2)(For removing access panels and fasteners)
- Flat-head screwdriver(Useful for prying covers if needed)
- Measuring tape(For verifying level and drum alignment)
- Digital multimeter (optional)(To check electrical readings if you must test sensors)
- Washer service manual (model-specific)(Provides model-specific calibration steps and safe procedures)
- Clean basin or towel(Catch any drips when panels are opened)
- Safety glasses and gloves(Personal protection during disassembly)
Steps
Estimated time: 60-90 minutes
- 1
Power down and prepare safely
Unplug the washer and disconnect power to avoid shocks while you access internal components. Move the machine away from the wall to give yourself space for testing. Have a dry area and a basin ready for any leaks. Why: Prevents accidents and protects sensitive electronics.
Tip: Keep a clear area; never touch exposed wiring with wet hands. - 2
Identify symptoms and collect baseline data
Record current performance: cycle duration, water level readings, and any vibration patterns. Note which loads reliably underperform. Why: Baseline data guides targeted adjustments and helps measure improvement.
Tip: Use a notebook or phone to capture consistent data points. - 3
Access service mode and calibration menu
Enter the model-specific service or calibration menu per the Kenmore manual. This mode provides access to sensor thresholds and timing parameters not available in normal operation. Why: You need these options to adjust calibration precisely.
Tip: Refer to the service manual for the exact key sequence; incorrect steps can cause faults. - 4
Adjust calibration offsets prudently
Make small, incremental changes to load sensing thresholds and spin timing. Test after each adjustment using a known load. Why: Small tweaks reduce risk and improve traceability of results.
Tip: Change one parameter at a time and document each change. - 5
Run test cycles and observe results
Execute controlled test cycles with a standard test load and observe water level, balance, and spin performance. Compare results to baseline and targets. Why: Validation confirms whether adjustments achieved the goal.
Tip: Use a consistent load for repeatable testing. - 6
Document results and finalize
Record final settings, take photos of the calibration menu, and perform a confirmatory test cycle. Why: Creates an auditable calibration record and helps prevent regression.
Tip: Store calibration notes with the model and date for future reference.
Questions & Answers
Can I calibrate a Kenmore washer myself?
Yes, with caution and a model-specific manual. Follow safety steps and work methodically to avoid damage.
Yes, you can calibrate it yourself if you follow safety steps and the model's manual.
What symptoms indicate calibration is needed?
Unbalanced spins, improper water level sensing, or clothes consistently coming out wet are common signs calibration is needed.
Symptoms include unbalanced spins, odd water levels, or damp clothes after a cycle.
Is it safe to calibrate without the service manual?
A manual provides model-specific steps and safe procedures. Without it, calibration may be inaccurate or risky.
It's safer to use the service manual or consult a technician for model-specific steps.
Do I need special tools?
Most calibrations require common tools like screwdrivers and a measuring tape; some models may need a service tool.
Usually, basic tools plus model-specific tools if required.
How long does calibration take?
Expect about 60-90 minutes for a thorough calibration, including setup and verification.
Typically about an hour to an hour and a half.
Will calibration affect warranty?
Calibration performed correctly should not void warranty; but if you cause damage, that could affect it. Check terms.
If you stay within safe procedures and use the manual, it should not affect warranty.
Watch Video
Key Takeaways
- Calibrate kenmore washer using a methodical, data-driven approach
- Always prioritize safety and use model-specific manuals
- Verify with repeatable test cycles to confirm results
- Document settings and outcomes for future reference