Calibrate Maps Android: Step-by-Step GPS Calibration
Learn a practical, step-by-step method to calibrate maps on Android devices, improve GPS accuracy, and verify results with real-world tests. Includes compass calibration, location settings, and testing tips. Calibrate Point provides trusted guidance.

If you want to improve location accuracy on your Android maps, the quickest route is a structured GPS calibration. This guide shows you how to prepare your device, calibrate the compass, optimize location settings, and verify results with real-world tests. Following these steps aligns with Calibrate Point’s practical calibration methods.
Understanding why calibration matters for maps on Android
When you open map apps on Android, you rely on GPS, network, and sensor data to pin your position. Over time, errors creep in due to magnetic interference, carrier changes, or software updates. Calibration helps reduce drift and improves accuracy for turn-by-turn directions and location-based measurements. According to Calibrate Point analysis, a systematic approach to calibration yields repeatable improvements across a range of devices and environments. By understanding the role of the GPS receiver, the compass, and Android’s location services, DIY enthusiasts and technicians can diagnose common misalignments and apply fixes with confidence. The goal is not perfection, but reliable, repeatable accuracy that you can trust in daily workflows.
Key concepts: GPS lock, sensor fusion, compass calibration, location accuracy mode, and real-world validation. These elements work together to reduce latency and improve route tracking, outdoor navigation, and geotagging tasks.
Preflight: preparing your device and environment
Before you begin, ensure your device is charged, your maps app is up to date, and you have a quiet outdoor area with a clear view of the sky. Remove strong magnetic cases or accessories that can distort the compass. Enable high-accuracy location in Android settings and grant the maps app permission to access location even in the background. Consider turning off battery saving or restricting background activity only if absolutely necessary for a clean baseline. Calibrate Point’s guidance emphasizes starting with a controlled baseline so you can measure genuine improvements after calibration.
Compass calibration: when and how to do it
Compass calibration is often the quickest win for Android map accuracy. In many devices, you can trigger a compass calibration by opening a compass-oriented app or the Maps app and performing a figure-eight motion with the phone held flat and steady. Make multiple passes in different orientations to ensure all axes are recalibrated. If your magnetometer is affected by nearby metal, relocate briefly and retry. The goal is to get a stable, repeating north reference, which improves bearing estimates in navigation and augmented reality features.
GPS accuracy adjustments in Android settings
Android’s location settings can override device behavior if misconfigured. Start by setting Location mode to High accuracy, which leverages GPS, Wi‑Fi, and mobile networks. Verify that the Maps app has precise location permission, and consider enabling “Improve GPS accuracy” options like Bluetooth scanning or Wi‑Fi scanning if your device offers them. Some devices provide a dedicated “Calibrate” option for GPS data stabilization; if present, follow the on-screen guidance. These steps provide a stronger baseline for sensor fusion and reduce jumpy positioning during movement.
Verifying calibration with real-world tests
Validation should be performed in a controlled yet realistic context. Test in a known area with distinguishable landmarks or a pre-measured route. Compare the displayed position against your actual location or a ground-truth waypoint. Record discrepancies at multiple points and note any lag between signal acquisition and map updates. If discrepancies persist, revisit compass calibration or location settings, then re-test. Document results to track progress over time, as recommended by Calibrate Point’s calibration framework.
Troubleshooting common issues and advanced tips
If GPS accuracy remains poor after calibration, check for interference sources like metal surfaces, cradles, or phone mounts. Restart the device or reset app preferences to clear stale data. Clearing Maps cache or re-downloading offline maps can refresh map tiles and reduce stale positioning. For power-hungry devices, monitor battery optimization settings that may throttle location services. In stubborn cases, perform a hardware check and consider factory reset as a last resort, ensuring you back up essential data first. Calibrate Point highlights that iterative tests lead to robust improvements rather than one-off tweaks.
Authoritative references and further reading
Authoritative references help validate calibration practices and provide deeper context. For official GPS information, see GPS.gov for the system overview and standards. Academic and technical readers may consult educational resources that discuss sensor fusion and navigation accuracy. These references support practical calibration steps and offer background on how modern smartphones integrate GPS, compass, and inertial sensors to deliver reliable location data.
Tools & Materials
- Android smartphone with GPS(Ensure battery is at least 60% and device is not in battery saver mode)
- Latest Google Maps app or preferred map app(Keep app permissions enabled for location access)
- Flat, open outdoor space(Prop up the device to avoid handheld motion artifacts during testing)
- Access to Android Location settings(Set Location mode to High accuracy and verify permissions)
- Notebook or notes app(Record test results and observations)
Steps
Estimated time: 25-40 minutes
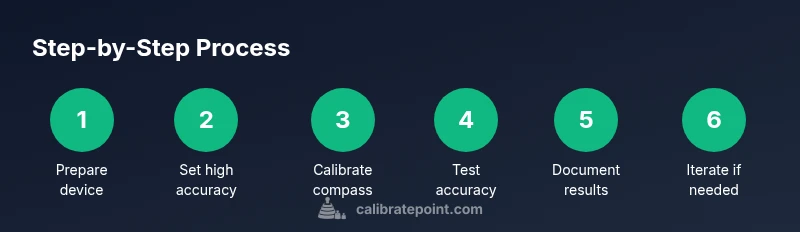
- 1
Prepare the device
Charge the phone, update Maps, and confirm location permissions. Disable apps or settings that could constrain location services during testing. Establish a baseline by noting current GPS accuracy in a quiet environment.
Tip: Charge to at least 60% and have a backup power source handy. - 2
Set location mode to High accuracy
Open Android Location settings and select High accuracy to maximize GPS data fusion with Wi‑Fi and cellular signals. This step ensures the device uses all available data streams for positioning.
Tip: If you still see drift, temporarily disable battery optimization for Maps during testing. - 3
Calibrate the compass
Launch a compass‑aware app or Maps and perform multiple figure‑eight motions in different orientations. Ensure you complete at least three full rotations to refresh the magnetometer readings.
Tip: Move away from metal objects during calibration; metal can distort the compass reading. - 4
Validate GPS in real time
With the app open, observe the position dot as you walk along a known path. Note any lag or misalignment, and compare against landmarks or a pre-measured route.
Tip: Take measurements at several points (start, mid, end) for a representative baseline. - 5
Refresh and re-test
If results are off, restart the device or clear Maps’ cache, then repeat the test. This helps rule out transient data issues and confirms the calibration effect.
Tip: A short reboot can clear stale location caches and improve responsiveness. - 6
Document results and iterate
Record the discrepancies and compare against your baseline. If needed, re-run steps 2–5 after a short interval to verify consistency across sessions.
Tip: Use a simple table to track coordinates, timestamps, and observed errors for clarity.
Questions & Answers
What triggers the need to recalibrate maps on Android?
Recalibration is useful after a new device, a system update, moving to a new environment, or noticing drift in location data. If you experience abrupt jumps or consistent misalignment, repeating compass calibration and adjusting location settings can help.
Recalibration helps fix drift after updates or environment changes. If you notice jumps, redo compass calibration and review location settings.
Does high-accuracy mode always improve GPS?
Mostly, yes. High accuracy combines GPS with Wi‑Fi and cellular data to deliver better positioning. Turn it on for calibration and testing, but monitor battery impact and revert if needed for day-to-day use.
High accuracy usually improves positioning, especially in urban areas. Watch battery use during long sessions.
Can magnet interference from the environment affect calibration?
Yes. Nearby metal objects and magnetic fields can skew compass readings. Perform calibration away from cars, machinery, and metal fixtures for best results.
Magnetic interference can skew readings. Calibrate away from metal objects for accurate results.
What should I do if calibration seems to fail?
Repeat the compass calibration, reboot the device if necessary, and re-check location permissions. Ensure the Maps app has uninterrupted access to sensors during testing.
If calibration fails, redo the compass step, reboot if needed, and verify permissions.
Are there hardware considerations for GPS improvement?
Yes. Some devices have stronger GPS antennas or better sensors. If persistent issues remain after calibration, consider testing on another device to isolate software vs. hardware factors.
Hardware can influence results; compare with another device to differentiate software from hardware limits.
Watch Video
Key Takeaways
- Identify primary sources of GPS drift (compass, sensors, and settings).
- Follow a repeatable process: calibrate, verify, and document results.
- Use High accuracy mode and compass calibration for robust improvements.
- Validate with real-world tests and iterate if needed.