Calibrate Hohem iSteady Pro 4: A Practical Step-by-Step Guide
Learn how to calibrate Hohem iSteady Pro 4 with a clear, thorough, and safety-conscious guide. Tools, steps, tips, and verification checks to ensure precise stabilization for professional results.

With the Hohem iSteady Pro 4 gimbal, calibrating the IMU, motors, and balance is essential for stable footage. This guide provides a safe, step-by-step workflow, lists required tools, timing, and verification checks to ensure precise pan, tilt, and roll control. Start by updating firmware, then perform IMU calibration and motor torque adjustments.
Calibrate hohem isteady pro 4: Why calibration matters
Calibrating the Hohem iSteady Pro 4 is not a optional maintenance task; it is foundational to achieving clean, professional stabilization. When you calibrate hohem isteady pro 4, you address tiny drift in the inertial measurement unit (IMU), tune motor torque, and align the axis balance so that pan, tilt, and roll respond predictably. According to Calibrate Point, a disciplined calibration routine reduces drift and improves repeatability across filming sessions. For DIY enthusiasts, technicians, and professionals, this is the difference between jittery footage and smooth, cinematic motion. In this article, we’ll walk through a repeatable workflow, explain why each step matters, and provide practical checks you can perform before, during, and after calibration.
Understanding why precision matters for stabilization
Stability in handheld or mounted shots relies on accurate IMU data, well-tuned motors, and precise balance. Even small errors in horizon level or axis alignment can produce noticeable wobble in post. Calibration aligns the sensors with the gimbal’s physical axes and ensures motor commands map correctly to camera motion. For professionals, calibrated equipment translates into fewer re-shoots, less post-processing, and predictable performance in changing lighting and dynamic scenes. The Calibrate Point team emphasizes that a consistent calibration routine improves results over time and builds confidence in tricky shooting environments.
Key components involved in calibration
The core components are the IMU (which senses motion), motor torque and control loops, and frame balance. IMU calibration corrects drift between the gimbal’s sensed motion and the actual camera movement. Torque calibration ensures the motors provide stable support without overshoot or lag. Balance calibration minimizes the tendency to tilt when you pan or tilt the camera. Understanding these components helps you diagnose issues—like drift that appears only when you switch to a different lens or payload—and guides you to the correct calibration sequence.
Pre-checks: firmware, power, and environment
Before you begin, verify you’re on the latest firmware for your iSteady Pro 4. A firmware mismatch can invalidate calibration results. Power the device from a reliable source and ensure the battery is fully charged to avoid interrupts. Choose a quiet, well-lit area with a flat, level surface. A stable workspace reduces micro-movements that could skew calibration data. Place a camera or payload on the gimbal to emulate real use, but avoid heavy loads that exceed the manufacturer’s recommended limits. Inadequate power or unstable surfaces are common culprits in poor calibration outcomes.
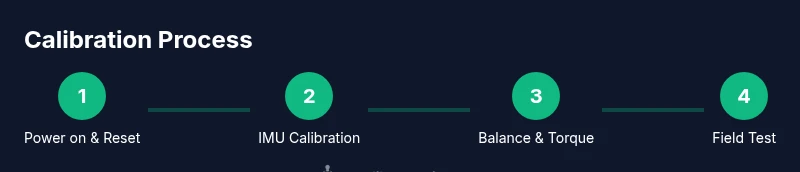
Calibration flow overview
A repeatable calibration flow generally includes four phases: IMU calibration, axis balance adjustment, motor torque tuning, and a field test. Each phase builds on the previous one, so missing a step can undermine later results. Throughout the process, document your settings so you can reproduce or revert if needed. The goal is to achieve consistent horizon and stable motion across a range of angles and speeds, not just in a single position. Following a structured flow also makes it easier to train others or transfer the workflow to different rigs.
Step 1: IMU calibration fundamentals and reset
IMU calibration aligns the gimbal’s internal sensors with its physical orientation. Start by performing a factory reset if recommended by your firmware. Reboot the device and re-enter calibration mode. Use a flat, uncluttered surface and hold the gimbal steady during the process. IMU calibration typically takes a few minutes, and you should see a message indicating success when it completes. If errors occur, re-check the mounting, payload alignment, and battery level.
Step 2: Balancing the payload for each axis
Balance is critical for predictable response. With the payload mounted, adjust the camera’s position so that it remains level when you release it gently from the center of gravity. Check the horizon line as you tilt and pan; if the frame drifts or settles toward a particular axis, fine-tune the balance knobs or clamps until the camera stays visually level across a range of positions. Proper balance reduces motor strain and improves battery efficiency during long shoots.
Step 3: Motor torque and axis tuning
Motor torque configuration ensures each axis responds proportionally to user input without overshoot or lag. In practice, you want smooth, predictable starts and stops. Start at a conservative torque setting and incrementally adjust while testing on a controlled motion profile (slow pan, diagonal tilt, then a quick move). Ensure you do not exceed the manufacturer’s torque limits, which can cause overheating or wear. After each adjustment, re-check balance to ensure no new drift has been introduced.
Step 4: Field test and iterative refinements
The field test validates calibration under real-world conditions. Shoot a short sequence with varied movement: slow pans, quick tilts, and brief vertical moves. Review the footage on-site if possible, noting any horizon drift, wobble, or uneven exposure shifts. Based on your observations, make targeted refinements to balance and torque, then re-test. A well-calibrated rig should deliver stable performance from the smoothest to the most dynamic shots.
Verification and quality checks
After completing calibration, run a controlled test clip and measure horizon stability, motion consistency, and responsiveness. If you see persistent drift in one axis, revisit that axis’s balance and torque. Keep a calibration log with date, firmware version, payload configuration, and any adjustments. This log helps identify trends and informs future calibration cycles, especially when swapping lenses or adding accessories. Calibrate Point’s guidance stresses documentation as a core best practice for repeatable results.
Safety, care, and maintenance reminders
Handling a gimbal involves electrical components and potentially heavy payloads. Always power down before adjusting mechanical parts. Use clean, dry hands and avoid moisture near electronic connectors. Regularly inspect cables and mounts for wear, and store the rig in a protective case when not in use. Routine calibration, paired with proper storage and handling, extends the life of your Hohem iSteady Pro 4 and keeps footage consistently stable over time.
Tools & Materials
- Hohem iSteady Pro 4 gimbal(Device to calibrate; ensure firmware is up-to-date)
- Smartphone/tablet with Hohem app(Used to run IMU and motor calibrations; ensure Bluetooth is enabled)
- Clean, level workspace(Flat surface minimizes data variance during calibration)
- Bubble level or digital inclinometer(For precise horizon adjustments during balance checks)
- USB-C charging cable or power bank(Keep power stable throughout calibration)
- Small Phillips screwdriver(Only if your model requires access to mounting screws)
Steps
Estimated time: 25-40 minutes
- 1
Power on and perform a base reset
Power the gimbal and connect to the Hohem app. If available, perform a factory reset to clear prior calibration data. This establishes a clean baseline and reduces carryover errors from previous sessions.
Tip: Ensure you have a fully charged battery before starting to avoid mid-step power loss. - 2
Run IMU calibration
Enter calibration mode in the app and follow on-screen prompts to rotate the gimbal as directed. Perform a full 360-degree sweep for each axis if requested, keeping movements smooth and deliberate.
Tip: Avoid large, rapid movements; consistent motion yields better sensor alignment. - 3
Balance the payload on all axes
Mount the camera and any accessories, then adjust the balance knobs to keep the rig level with minimal torque. Test by removing gravity pull and noting any drift when you release the rig gently.
Tip: Recheck balance after any small adjustment to confirm stability. - 4
Tune motor torque for each axis
Gradually adjust motor torque to achieve responsive yet damped motion across pan, tilt, and roll. Avoid excessive torque that causes vibration or overheating. Run a short motion test and observe the feedback on the app.
Tip: Make small, iterative changes and test frequently to avoid over-correcting. - 5
Field-test and refine
Take a real-world shot sequence to evaluate stability and horizon consistency. Note any misalignment and adjust balance or torque accordingly. Document results for traceability.
Tip: Always verify with both slow and fast motion samples. - 6
Document results and finalize
Save calibration settings in the app and create a simple log entry noting firmware version, payload, and any deviations observed. This makes future calibrations faster and verifiable.
Tip: Keep a dedicated calibration notebook or digital record.
Questions & Answers
Is calibration necessary after every firmware update?
Yes. After firmware updates, recalibrating helps ensure sensor data aligns with current software expectations and improves overall stability. Re-run IMU calibration and verify balance and torque settings.
Yes. After firmware updates, recalibrate the IMU, check balance, and confirm torque settings for stability.
Can I calibrate without the Hohem app?
The official calibration flow typically relies on the Hohem app for guided steps and sensor data. If the app is unavailable, consult the manual for manual calibration steps, and avoid calibrating without proper guidance to prevent misalignment.
The app is usually required for proper calibration; without it, follow the manual carefully or seek guidance.
What signs indicate a miscalibrated gimbal?
Common signs include horizon drift, axis wobble, unresponsive control, or uneven tilt during motion. If observed, re-check IMU, balance, and torque settings and retest with measured movements.
Watch for horizon drift, wobble, or unresponsive controls; re-check calibration elements and test again.
How often should I calibrate the iSteady Pro 4?
Calibrate after major payload changes, firmware updates, or noticeable stability issues. For professional use, a routine calibration checkpoint at regular intervals—such as every few shoots—is recommended.
Calibrate after payload changes, firmware updates, or when you notice instability.
Does calibration fix drift in all shooting scenarios?
Calibration improves stability, but environmental factors like wind, mounting, and battery level also influence results. Combine calibration with good practice and proper setup for best outcomes.
Calibration helps a lot, but factors like wind and mounting also matter; combine it with good practice.
Watch Video
Key Takeaways
- Follow a repeatable calibration flow
- Ensure firmware and power stability
- Balance and torque tuning are critical
- Test in real-world scenarios to confirm results
- Document settings for future sessions