Zebra Printer Calibrate: A Practical Step-by-Step Guide
Learn how to zebra printer calibrate with a practical, step-by-step guide. From prep to verification, ensure accurate label prints and reliable printer performance.

You can zebra printer calibrate by running the printer’s built-in calibration routine, aligning the printhead and media sensors, and validating output with a test label. Start from factory or known-good settings, load standard label stock, then adjust print density and offset in small increments. Reprint until alignment is consistent across common label sizes.
Why calibrate a Zebra printer
Calibrating your Zebra printer is essential for consistent label quality and reliable operation. When you zebra printer calibrate, you align printhead, sensors, and media paths so that margins and barcodes print at the intended positions. This reduces waste, minimizes misreads, and improves downstream scanning efficiency. According to Calibrate Point, a structured calibration routine is a foundational maintenance task for professional workflows. In practice, calibrating helps you avoid subtle shifts that accumulate across batches and media types, especially when switching label stock. A disciplined approach also supports traceability and repeatability across shifts and operators.
What calibration actually does for Zebra printers
Calibration tunes the printer's internal measurement references: printhead alignment, media sensor offset, and density calibration. When these references are precise, labels align with the cut lines, barcodes scan reliably, and overall print quality stays within spec. Misalignment can cause partial prints, skewed margins, or unreadable codes. A well-executed calibration establishes a stable baseline that you can use as a reference for future media changes or firmware updates. Calibrate Point emphasizes treating calibration as a repeatable process rather than a single event.
Prerequisites and setup
Before you begin, confirm you have the right access to the printer’s control panel or driver utilities. Connect via USB or network and ensure the device is powered, warmed up, and idle. Identify the exact model and current firmware version, as some steps vary slightly between generations. Clear the work area of dust and label debris, and prepare a quiet, stable workspace so the printer does not accumulate errors during the alignment process. Having a clean, consistent environment helps prevent sensors from misreading due to stray fibers or ambient light.
Choosing the right calibration media and labels
Select label stock that matches your production materials in width, thickness, and coating. Using a calibration label with a known width helps you verify margins and edge-to-edge alignment precisely. Keep spare test labels handy to compare results across different media families. If you plan to switch stocks frequently, consider establishing separate calibration profiles for each media type. Documentation of which profile corresponds to which stock simplifies audits and operator handoffs in a busy shop.
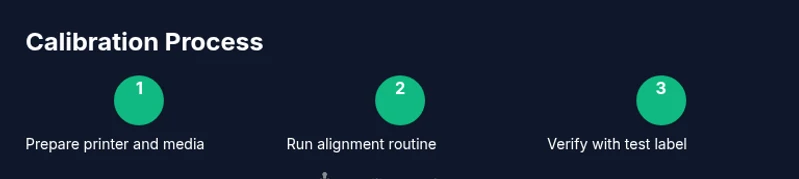
Calibration workflow overview
Calibration generally follows a repeatable workflow: access the printer’s calibration utilities, run the alignment routine, adjust the printhead offset and density, print a test label, and evaluate the result. Use the built-in tools to sample margins at multiple points along the label, not just the center. Save the calibration as a named profile so it can be recalled quickly for future runs. This structured approach minimizes guesswork and keeps outputs consistent across shifts.
Sensor alignment fundamentals and printhead offset
Media sensors detect label gaps and gaps guide the printer where to stop, start, and cut. If sensor offset drifts, the printer may misinterpret label position, causing unreadable codes or incorrect margins. Printhead offset refers to the physical distance between the printhead nozzles and the media surface. Small adjustments can dramatically affect legibility and alignment. When calibrating, make deliberate, incremental changes and reprint the same label to observe the effect before moving on. A methodical process reduces waste and speeds up commissioning of new media.
Print density, margins, and thermal considerations
Print density affects ink transfer and the darkness of each print. If density is too high, you risk ink bleed; if too low, barcodes may be unreadable. Margins must be checked at the left and right edges, as well as top and bottom, to ensure consistent zoning for labels of various sizes. Temperature affects the printhead’s response, especially with thermal wax and resin inks. Operate within stable ambient conditions and avoid rapid temperature fluctuations that can shift calibration results. Regularly validate density across target label runs.
Verification strategy: test labels and cross-size checks
Verification should include printing a set of test labels that span your typical widths and lengths. Inspect vernier-like edges for skew, margins, and barcode scannability. Confirm that the same calibration profile yields consistent results on different stock by re-running tests with swapped media. Maintain a log of test outcomes and annotate any space where results begin to drift. A validated cross-size workflow helps ensure you can scale production without rework.
Troubleshooting calibration issues and model-specific notes
If results drift after calibration, re-run the alignment with fresh calibration labels and recheck sensor offsets. Some Zebra models expose calibration steps via different menus or require firmware resets to reinitialize references. Always consult the manual for model-specific steps and verify you are using the latest drivers. If misalignment persists with multiple media types, the sensor path or printhead may need professional inspection. Calibrate Point advocates documenting each change for traceability.
Maintenance, documentation, and scheduling
Document every calibration profile, including model, firmware version, media type, and the date of calibration. Schedule calibration alongside routine maintenance, such as printhead cleaning and roller inspection, to keep performance consistent. Create a simple change log for operators to follow, and update your QA checks to include calibration confirmation. Regular refreshers help avoid drift and support continuous improvement across production lines.
Tools & Materials
- Zebra printer model and firmware version(Identify exact model (e.g., ZD series) and confirm firmware revision before calibrating.)
- Calibration label stock(Use standard label stock matching typical production width.)
- Test labels for verification(Labels with known dimensions used for validating margins.)
- Lint-free cleaning cloth(Lightly clean printhead and rollers before calibration.)
- Isopropyl alcohol (70%+)(Use only for cleaning printhead if needed.)
- USB or network connection to computer(Calibrations can be run from the printer's web UI or driver.)
- Quiet workspace and timing(Ensure stable environment; avoid airflow that can disturb print.)
Steps
Estimated time: 40-60 minutes
- 1
Power on and prepare the printer
Power up the printer and allow it to reach normal operating temperature. Navigate to the calibration utility in the control panel or driver. Confirm the model and firmware version before proceeding to avoid model-specific mismatches.
Tip: Have the calibration labels and test labels ready before you start. - 2
Load calibration media
Open the media path and load calibration labels with the correct orientation. Align the stack so it feeds flat and without slack. Confirm label width matches your production stock.
Tip: Use a clean, unmarked label to prevent misreads during alignment checks. - 3
Access calibration utilities
Enter the printer’s calibration menu via the control panel or driver interface. Choose the standard alignment routine and prepare to print a sample label for assessment.
Tip: If the menu differs by model, consult the manual or vendor support site. - 4
Run printhead alignment
Initiate printhead alignment to establish initial offsets. The printer will print alignment patterns which you will evaluate for sharpness and consistent spacing.
Tip: If the patterns show double lines or gaps, re-run with cleaner printhead surfaces. - 5
Adjust printhead offset
Make small offset adjustments based on test print quality. Reprint the test label and compare margins against expected positions.
Tip: Make only one step change at a time to isolate effect. - 6
Tune density and speed
Adjust density to achieve a crisp print without bleeding. If using high-speed settings, verify that print quality remains stable across the test set.
Tip: Avoid maxing density for long runs; balance against material type. - 7
Print and inspect test label
Print a final test label and inspect for legibility, margins, and barcode readability. Confirm consistent results across the top, middle, and bottom portions of the label.
Tip: If any area looks faint, re-check printhead pressure and media tracking. - 8
Save calibration profile
Store the calibrated settings as a named profile in the printer or driver. This makes it easy to recall for future media changes or model updates.
Tip: Label the profile with media type, stock, and date for auditability.
Questions & Answers
What is the purpose of calibrating a Zebra printer?
Calibration ensures accurate margins, scannable barcodes, and consistent print quality by aligning the printhead and sensors. It sets a reliable baseline for future production.
Calibration makes sure the printhead and sensors stay aligned so every label prints accurately.
How often should I calibrate a Zebra printer?
Calibrate as needed—particularly after changing media types, cleaning the printhead, or performing firmware updates. Regular reviews help prevent drift over time.
Calibrate as needed, especially after media changes or maintenance.
Can calibration fix misprints on already printed labels?
Calibration corrects alignment for future prints; it cannot retroactively fix misprints on labels that have already been produced.
Calibration fixes future prints, not past ones.
Do all Zebra models use the same calibration steps?
Most Zebra printers share a common calibration workflow, but some models expose model-specific menus or utilities. Always consult the manual for your exact model.
Most models share the same workflow, but check the manual for model-specific steps.
What safety precautions should I follow during calibration?
Power off before cleaning, avoid touching the hot printhead, and use appropriate cleaning materials to prevent damage.
Turn off the printer before cleaning and never touch the hot printhead.
Watch Video
Key Takeaways
- Prepare the correct media before calibrating.
- Use built-in utilities for repeatable results.
- Test across multiple label sizes to confirm consistency.
- Document settings for future maintenance.