How to Calibrate a VIVOSUN pH Pen: A Practical Guide
Master calibrating a VIVOSUN pH pen with a two-point method using fresh buffers, proper rinsing, and storage tips to maintain reliable pH readings.

This guide will teach you how to calibrate a VIVOSUN pH pen to ensure accurate readings for hydroponics, soil, or nutrient testing. You'll learn two-point calibration using fresh pH 4.0 and pH 7.0 buffers, how to clean the electrode, and best practices for storage and rechecking. By the end, you'll confidently maintain pH accuracy with the Calibrate Point recommended method.
Why Calibration Matters for a VIVOSUN pH Pen
Accurate pH readings are the backbone of effective nutrient management in hydroponics and soil-less systems. A drift in pH sensing can lead to nutrient lockout, reduced nutrient availability, and stressed or stunted plants. The VIVOSUN pH pen uses an electrochemical sensor whose response shifts over time due to aging, fouling, and temperature effects. Regular calibration resets the sensor reference to the known values defined by buffer solutions, aligning the pen’s readings with real pH levels. According to Calibrate Point, consistent calibration not only improves measurement accuracy but also extends the life of your instrument by ensuring you use it correctly rather than force-reading. In practice, routine calibration builds confidence that what you see on the display matches the growing media or nutrient solution you’re testing. Take charge of your measurements to protect plant health and preserve your results over growing cycles.
Understanding pH Buffers and Two-Point Calibration
pH buffers are stable solutions with known acidity or basicity, used to set a reference on your pH meter. For a two-point calibration, you’ll typically use a neutral buffer (around pH 7) and a acidic buffer (around pH 4 or 5). The goal is to map the probe’s response across two points so the meter can interpolate readings across the entire pH range. Temperature can influence buffer performance and the electrode response, so work at roughly room temperature and avoid using buffers that are expired or contaminated. With careful handling, a two-point calibration establishes both an offset (how far off you are at a reference pH) and a slope (how the reading changes with pH). Calibrate Point analysis shows that using fresh buffers and following the two-point method yields the most reliable results for consistent hydroponic monitoring.
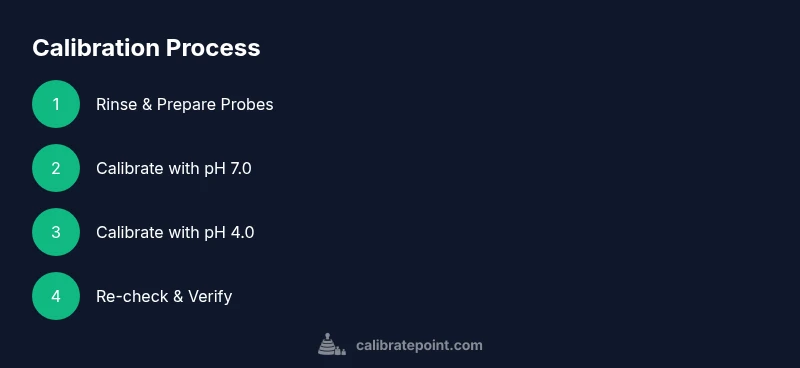
The Two-Point Calibration Workflow for the VIVOSUN pH Pen
Two-point calibration is straightforward but requires discipline. Start with a clean electrode and rinse it with distilled water between buffers. Immerse the probe in the pH 7.0 buffer, wait for the reading to stabilize, and adjust the meter’s reference to match 7.0. Rinse, then immerse in the pH 4.0 buffer, wait for stabilization, and adjust to 4.0. Some VIVOSUN models use a small calibration screw; if yours does, use a clean, non-metal tool to adjust gently—go slowly to avoid overshooting. After calibrating, re-check the pH 7.0 buffer to confirm the slope and offset remain aligned. If your model lacks a calibration screw, follow the button-based calibration sequence described in the user manual. This two-point method ensures the meter remains accurate across the common testing range you’ll encounter in nutrient solutions and growing media.
Common Mistakes and Troubleshooting During Calibration
Common issues include drift after calibration, inconsistent readings between buffers, or failure to stabilize. Ensure buffers are at room temperature and are fresh; expired buffers can yield false offsets. Rinse thoroughly between buffers to prevent cross-contamination, and avoid letting the electrode dry out. If the meter cannot be calibrated to the correct values, inspect the probe for cracks or buildup, and consider replacing the electrode if drift persists beyond a few calibrations. Temperature compensation, if your model supports it, should be disabled or adjusted to match ambient conditions during calibration. Finally, always verify calibration by testing a known pH sample or one of the buffers again to confirm accuracy.
Maintaining Accuracy Over Time: Storage, Cleaning, and Rechecking
Calibration is most reliable when paired with proper maintenance. Clean gently with distilled water and a soft tissue after each calibration to remove residual buffer and any mineral deposits. Store the probe in a protective cap with a small amount of storage solution if recommended by the manufacturer, or keep the tip submerged in buffer when not in use for short periods. Regular rechecking—ideally on a biweekly to monthly cadence depending on usage—helps catch drift early. If you notice consistent drift over multiple calibrations, it may be time to replace the electrode. Following best practices reduces downtime and ensures you’re making decisions based on trustworthy data. Through these habits, your VIVOSUN pH pen remains a reliable tool for calibrating your nutrient management strategy.
Verifying Accuracy in Real-World Use
Calibration should be followed by practical checks in the solutions you test regularly. After calibration, measure a reference sample with a known pH (or with one of the buffers again) to confirm the result aligns closely with the expected value. In hydroponic setups, test both a nutrient solution and the rinse water to ensure readings remain stable across typical conditions. If readings drift in real-world use, you may experience sensor fouling or electrolyte depletion, both of which require following the cleaning and calibration cadence outlined above. Keeping a simple log of calibration dates, buffer batch numbers, and observed readings can help you track instrument performance over time and predict when maintenance is due.
Tools & Materials
- VIVOSUN pH pen / probe(Ensure the model supports two-point calibration or be prepared to follow the device's specific calibration sequence)
- pH buffer solutions (fresh)(Typically pH 7.0 and pH 4.0; use fresh buffers and check expiration dates)
- Distilled water for rinsing(Used between buffers to prevent cross-contamination)
- Clean, lint-free cloth or tissue(For drying the electrode after rinsing)
- Small screwdriver or calibration tool (if your model uses a screw)(Some pens require a tiny screwdriver to adjust a calibration screw)
- Gloves (optional)(Protect hands when handling buffers and to keep the electrode clean)
- Calibration log or notebook(Record dates, buffer lot numbers, and readings)
Steps
Estimated time: 20-40 minutes
- 1
Prepare and inspect
Lay out buffers, ensure the kit is complete, and inspect the probe for any obvious cracks or buildup. If the buffer bottles are old, replace them with fresh ones. This initial check reduces drift and improves accuracy.
Tip: Verify buffers are at room temperature before starting. - 2
Rinse and dry the electrode
Rinse the probe tip with distilled water and gently pat dry with a lint-free towel. Do not rub aggressively, as this can damage the sensor.
Tip: Keep the tip wet during calibration if the device recommends keeping it in a storage solution. - 3
Calibrate with pH 7.0 buffer
Immerse the probe in the pH 7.0 buffer and wait for the reading to stabilize. If your model uses a calibration knob or button, adjust until the display reads exactly 7.0.
Tip: If your device lacks a knob, perform the on-screen calibration sequence instead. - 4
Rinse again between buffers
Rinse the probe thoroughly with distilled water to prevent cross-contamination before the next buffer.
Tip: Dry the tip lightly with a clean cloth to avoid dilution effects. - 5
Calibrate with pH 4.0 buffer
Submerge the probe in the pH 4.0 buffer and wait for stability, then adjust to read 4.0 on the display.
Tip: Use a calm, slow motion when adjusting for precision. - 6
Re-check at pH 7.0
Rinse, re-immerse in the pH 7.0 buffer, and confirm the meter still reads 7.0. This confirms a correct slope and offset.
Tip: If the reading is off by more than ±0.1 pH, repeat the calibration steps or consider electrode replacement. - 7
Final rinse and dry
Rinse again with distilled water, blot dry, and store according to manufacturer guidelines.
Tip: Avoid leaving buffers on the electrode; store with a protective cap if available. - 8
Document and test a real sample
Log the calibration results and test a real nutrient solution to ensure readings align with expected values.
Tip: Keep a running log to track instrument drift over time.
Questions & Answers
How often should I calibrate the VIVOSUN pH pen?
Calibrate based on usage and drift, but in most hydroponic setups it's common to recalibrate every 1-2 weeks or at the start of a new growing cycle. If readings drift beyond 0.1 pH between checks, recalibrate sooner.
Calibrate according to how often you test nutrients and growth media; if drift is noticed, recalibrate promptly.
What buffers should I use for two-point calibration?
Use fresh pH 7.0 and pH 4.0 buffers for a standard two-point calibration. Avoid buffers that are expired or contaminated, and follow the device's manual if it uses different buffers.
Two-point calibration with fresh pH 7.0 and 4.0 buffers is standard practice.
Why won't my pH pen calibrate correctly?
Reasons include expired buffers, dirty electrode, or improper temperature. Ensure buffers are fresh, rinse between solutions, and calibrate at room temperature. If issues persist, the electrode may be worn out.
Expired buffers or a dirty probe are common culprits; refresh buffers and clean the probe before retrying.
Can I calibrate with distilled water instead of buffers?
Distilled water is not a substitute for calibration buffers. Buffers provide known pH references; distilled water serves for rinsing. Always calibrate with the recommended buffers first.
Distilled water is for rinsing, not calibration.
How do I know calibration was successful?
After calibration, test the pH pen on both buffers again to confirm readings match target values within ±0.1 pH. Then measure a real sample to ensure consistency with expectations.
Check that readings match the buffer targets, then test a real sample for confidence.
Should temperature compensation be used during calibration?
If your model supports temperature compensation, use it only if you can accurately set the ambient temperature. Otherwise calibrate at room temperature and avoid temperature extremes during calibration.
Only use temperature compensation if you can set a known temperature accurately.
Watch Video
Key Takeaways
- Calibrate with fresh buffers to reset offset and slope.
- Always rinse between buffers to avoid cross-contamination.
- Verify accuracy by rechecking buffers and testing a real sample.
- Maintain logs to track instrument performance over time.